On This Page
Recurring Billing Upgrade Guide
Use this guide to learn about the Recurring Billing upgrade process and find additional information.
- Audience and Purpose
- This guide is written for merchants who use the legacy Recurring Billing service with secure storage and must update their order management system and recurring billing processes to use the upgraded Recurring Billing service that is available through theBusiness Centerand the REST API.
- Conventions
- The following special statement is used in this document:IMPORTANTAnImportantstatement contains information essential to successfully completing a task or learning a concept.
- Related Documentation
- Visit theCybersourcedocumentation hub to find additional technical documentation.
- Interactive REST API Reference
- Use the interactive REST API Reference in theCybersourceDeveloper Center to create an example REST API request message.
- Customer Support
- For support information about any service, visit the Support Center:
Recent Revisions to This Document
26.03.01
This revision contains clarifications, corrections, and technical changes throughout the
document.
25.12.03
This revision contains only editorial changes and no technical updates.
25.12.02
- Updated Graphical Overview of Upgrading to New Recurring Billing
- Corrected two labels (Business Center UIandAPI) in the second diagram shown in Recurring Billing Upgrade and Migration Overview.
25.12.01
- New Graphical Overview of Upgrading to New Recurring Billing
- The graphical overview of upgrading to the new Recurring Billing was updated. See Recurring Billing Upgrade and Migration Overview. The graphic is now available as a one-page PDF. See Recurring Billing Upgrade and Migration.
- Updated the Migration Prerequisites
- See Preparation:
- Cybersourcemigrates all legacySecure Storagetokens toTMS(notRecurring Billingtokens).
- Only Cancelled subscriptions and Completed subscriptions will not migrate from legacy Recurring Billing to the new Recurring Billing system.
- Cybersourcedoes not offer training for this migration.
- Migration to the new Recurring Billing system does not remove access to historical data about the legacy subscriptions.
- Changed the title of the Stabilization Period Section
- Making a One-Time Payment After Migrating to New Recurring Billing
- The steps to request a one-time payment are different after migrating to the new Recurring Billing. See Make a One-Time Payment After Migration.
25.10.01
- Introduction to Upgraded Recurring Billing
- Added a graphic that presents an overview of Recurring Billing upgrade and migration. See Recurring Billing Upgrade and Migration Overview.
- Added comparisons of legacy Recurring Billing, new Recurring Billing, andToken Management Service(TMS) API fields. See Comparison of Business Center UI Sections and API Fields.
- Updated the comparison of report fields. See Upgraded Report Fields.
- Migration Activities
- Added recommended subscription and system validations to perform afterCybersourcenotifies you that your upgrade and migration is complete in the testing or preproduction environment. See Test Checklist Recommendations.
- Post-Migration Information
Introduction to Upgrading the Recurring Billing Service
Cybersource
replaced the legacy Recurring Billing service with an
upgraded Recurring Billing service. You can access the service in the Business Center
only, or you can access it in the Business Center
along with REST API for Recurring
Billing, and the Token Management Service
(TMS
).IMPORTANT
The Recurring Billing service is available through the
REST
API only. The service is not supported by the SCMP
API
or the Simple Order
API. If you create and manage subscriptions using the SCMP
API or the Simple Order
API, you must integrate to the Recurring
Billing service that uses the REST API. Use the upgraded Recurring Billing service to manage payment plans and subscriptions for
recurring payment schedules. TMS stores your customers' payment information and personal data
within secure Visa data centers, reducing storage risks and Payment Card Industry Data
Security Standard (PCI DSS) compliance scope.
These are some of the ways the upgraded Recurring Billing service benefits merchants and
customers:
• Reducing the effort required to manage automated payments and payment card updates
• Decreasing late payments by using scheduled, recurring payments
• Improving customer relationships with a smoother, more reliable online experience
• Lowering costs and minimizing waste through streamlined payment processes
• Enhancing security by protecting payment information with tokenization
Recurring Billing Upgrade and Migration Overview
This section provides an overview of the Recurring Billing upgrade and migration
process.
Figure:
Recurring Billing Upgrade and Migration: Overview

Figure:
Recurring Billing Upgrade and Migration: Getting Started

Upgraded Recurring Billing
The upgraded Recurring Billing consists of three key elements:
- Customer token: Stores customer billing, shipping, and payment details. See the Token Management Service Developer Guide
- Plan: Stores the billing schedule
- Subscription: Combines the customer token and plan. Determines the subscription start date, name, and description
This diagram shows the components of automatic, recurring
payments:
Figure:
Recurring Payment Components

Plans
Plans are a new feature in the upgraded Recurring Billing service. They help you manage setup costs and recurring amounts across multiple subscriptions. You can create and manage plans in the Business Center or through the API.
A plan defines the billing details for a subscription, including a setup fee and a recurring amount. When creating a subscription for a customer, you assign the customer to a plan. Individual subscriptions are still available, but they require individual management.
When creating and managing subscriptions, plans provide a flexible way to standardize setup fees and recurring amounts while simplifying administration:
- Assign customers to a plan when creating a subscription
- Apply plan changes to new subscriptions only, or to both new and existing subscriptions
- Continue using individual subscriptions, with individual management
- Retrieve, amend, activate, deactivate, or delete plans
Plan Types
Recurring Billing supports two types of plans:
- Standard plans: Created and stored within the Recurring Billing service for reuse. You can assign these plans to multiple subscriptions.
- One-time plans: Created for a single subscription and not stored for reuse or assigned to other subscriptions.
Billing Cycle Options
Plans support the following billing cycle options:
- A payment schedule with no end date
- A payment schedule with a fixed number of payments
Creating and Updating Plans
When creating or updating a plan, you can:
- Define the billing schedule by setting the amount, currency, and frequency
- Specify the number of billing cycles for a fixed number of payments
- Include an optional setup fee
- Apply a single plan to multiple individual subscriptions
- Make changes to the plan and choose whether to apply them only to new subscriptions or to all existing subscriptions
Subscriptions
Subscriptions represent the active relationship between a customer and a plan. A subscription
combines the customer token with a plan and defines when recurring payments begin.
Subscriptions can be retrieved, amended, suspended, reactivated, or cancelled.
When creating or updating subscriptions, you can manage how customers are billed and how plans
are applied:
- Create a subscription by using an existing plan or creating a one-time plan
- Assign the customer token that contains the customer’s billing, shipping, and payment details
- Move a subscription from one plan to another plan
- Set or update the subscription start date
Legacy and Upgraded Recurring Billing Feature Comparison
This table compares key features of the legacy Recurring Billing to the new Recurring
Billing service.
Feature | Legacy Recurring Billing | Upgraded Recurring Billing |
|---|---|---|
Subscription management | Create, manage, edit, and cancel subscriptions. Approve,
unapprove, skip, or unskip payments. | Create, retrieve, amend, reactivate, suspend, and cancel
subscriptions. Pre-payment approval flows are no longer supported.
|
Plan management with subscription templates | Not available. | Full plan management that includes create, retrieve, amend,
activate, deactivate, and delete. |
Integration methods |
| REST API |
Online portal | Business Center Create subscriptions by using these
services:
| Business Center Create subscriptions by using these
services:
|
Data security | Secure storage tokenization, legacy with end-of-life
plan | Token Management Service (TMS) |
Failed transaction retry logic | Maximum of five system retries | Maximum of five system retries, based on the billing period
unit. |
Payment methods |
|
|
Account Updater | Optional support on secure storage | Optional support on TMS |
IMPORTANT
To make a one-time on-demand payment, submit a Make Payment
request in the Token Management module of the
Business Center
. For details, see
Make a One-Time Payment After Migration.Legacy and Upgraded Business Center and API Service Feature Comparison
Business Center
and API Service Feature ComparisonThis table compares common recurring billing features between the legacy Recurring
Billing service and the upgraded Recurring Billing service and Token Management Service (TMS).
It shows how features available through the SCMP and Simple Order APIs map to the REST API and
the Business Center.
Feature | Legacy Recurring Billing | Upgraded Recurring Billing |
|---|---|---|
Email notifications | Set up notifications in the Business Center. | Notifications are sent automatically to the email address associated with the
customer token. They contain information from the plan and subscription details for
a prepayment, successful payment, or failed payment. Sending these notifications can
be disabled in the Recurring Billing settings. |
Merchant-initiated transactions | For more information, see Support for Merchant-Initiated Transactions and
Credential-on-File for Visa, Mastercard, and Discover | |
Optional data storage | Other data storage where data is encrypted or not encrypted. | Not supported |
Replacement expiration dates | Contact customer support to enable your account. | Not supported |
Customer subscription sharing | Contact customer support to enable your account. | Not supported |
Account Updater | Integrated with Recurring Billing to keep card data current through SCMP API or
Simple Order API batch uploads and automatic updates. | Integrated with Recurring Billing to keep card data current through REST API
batch uploads and automatic updates |
Legacy and Upgraded Business Center and API Service Action Comparison
This table compares common recurring billing actions between the legacy Recurring Billing
service and the upgraded Recurring Billing service and Token Management Service (TMS). It
shows how actions performed using the SCMP and Simple Order APIs are handled through the REST
API and the Business Center.
Action | Legacy Recurring Billing | Upgraded Recurring Billing |
|---|---|---|
Creating an on-demand customer profile token | Use the create subscription service to create a subscription ID. | Use the Payments API or the Virtual Terminal in the Business Center to make a
one-time, zero-amount payment with customer token creation. |
Creating a customer profile token with a setup fee | Use the create subscription service to create a subscription ID and use the
authorization and capture services to charge the setup fee. | Use the Payments API or the Virtual Terminal in the Business Center to make a
one-time payment with customer token creation. |
Creating an echeck customer profile token | Use the create subscription service to create a subscription ID. | Use the Payments API or the Virtual Terminal in the Business Center to make a
one-time payment with customer token creation. |
Creating an installment subscription with payment card or echeck | Use the create subscription service to create a subscription ID and installment
subscription. | Use the REST API or the Business Center to create a plan with a fixed number of
payments and to create a subscription with a customer token. |
Creating a recurring subscription with a payment card or echeck | Use the create subscription service to create a subscription ID and recurring
subscription. | Use the REST API or the Business Center to create a plan that bills
indefinitely and to create a subscription with a customer token. |
Retrieving a subscription | Use the retrieve subscription service to retrieve a subscription ID. | Use the Recurring Billing REST API or the Business Center to retrieve a
subscription or a list of subscriptions. |
Updating a subscription with a new payment card | Use the subscription update service to update a subscription payment
card. | Use TMS with the REST API or the Business Center to update the customer profile
token. |
Updating an echeck account number | Use the update subscription service to update an echeck account number. | Use TMS with the REST API or the Business Center to update a customer profile
token. |
Changing a payment method | Use the update subscription service to change a subscription payment
method. | Use TMS with the REST API or the Business Center to update a customer profile
token. |
Updating subscription payments | Use the update subscription event service to edit a subscription | Edit subscription details in the Business Center or by using the REST API |
On-demand transaction | Use the authorization and capture service for an on-demand payment | Use the Virtual Terminal in the Business Center or Payments API |
Converting a transaction to a subscription | Use the create subscription service to create a subscription ID using an
existing transaction request ID | Use the Recurring Billing REST API or the Business Center to create a
Follow-On subscription using the existing successful transaction ID |
Cancelling a subscription | Use the update subscription service to cancel a subscription | Use the REST API or the Business Center to cancel a subscription |
Deleting a subscription | Use the delete subscription service to delete a subscription | You cannot delete a subscription. Use the REST API or the Business Center to
cancel a subscription |
Comparison of Business Center UI Sections and API Fields
Business Center
UI Sections and API Fields
This table compares how Recurring Billing elements are named in the legacy Recurring Billing system
and in the upgraded system, across both the Business Center and APIs. It also shows how legacy
fields map to the new system during migration.
- Corresponding Business Center elements in the upgraded system appear in theBusiness Center SectionandField Namecolumns forNew Recurring BillingandTMS.
- Corresponding API field names appear in theREST API Fieldcolumns forNew Recurring BillingandTMS.
Legacy Recurring Billing | New Recurring Billing | TMS | |||||||
|---|---|---|---|---|---|---|---|---|---|
Business Center Section | Field Name | Simple Order API Field | Business Center Section | Field Name | REST API Field | Business Center Section | Field Name | REST API Field | Type |
Customer Information | City | billTo_city | Payment Details / Billing Address | City | — | Billing Information | City | billTo.locality | Payment Instrument |
Company | billTo_company | Payment Details / Billing Address | Company | — | Billing Information | Company | billTo.company | Payment Instrument | |
— | billTo_companyTaxID | Payment Details / echeck details / Buyer's details | Company Tax ID | — | Payment Information / Check | Company Tax ID | buyerInformation.companyTaxID | Payment Instrument | |
Billing Countries | billTo_country | Payment Details / Billing Address | Country | — | Billing Information | Country | billTo.country | Payment Instrument | |
Customer ID | billTo_customerID | Customer Details | Customer Reference | — | Customer Details | Customer Reference | buyerInformation.merchantCustomerID | Customer Token | |
Email Address | billTo_email | Payment Details / Billing Address | Email | — | Billing Information | Email | billTo.email | Payment Instrument | |
First Name | billTo_firstName | Payment Details / Billing Address | First Name | — | Billing Information | First Name | billTo.firstName | Payment Instrument | |
Last Name | billTo_lastName | Payment Details / Billing Address | Last Name | — | Billing Information | Last Name | billTo.lastName | Payment Instrument | |
Phone Number | billTo_phoneNumber | Payment Details / Billing Address | Phone | — | Billing Information | Phone Number | billTo.phoneNumber | Payment Instrument | |
Postal Code | billTo_postalCode | Payment Details / Billing Address | Zip/Postal Code | — | Billing Information | Postal Code | billTo.postalCode | Payment Instrument | |
State | billTo_state | Payment Details / Billing Address | County/Region | — | Billing Information | County/Region | billTo.administrativeArea | Payment Instrument | |
Street Address 1 | billTo_street1 | Payment Details / Billing Address | Address | — | Billing Information | Street Address 1 | billTo.address1 | Payment Instrument | |
Street Address 2 | billTo_street2 | Payment Details /
Billing Address | Flat, Suite, Floor, Building, etc. | — | Billing Information | Street Address 2 | billTo.address2 | Payment Instrument | |
Legacy Recurring Billing | New Recurring Billing | Token Management Service | |||||||
Business Center Section | Field Name | Simple Order API Field | Business Center Section | Field Name | REST API Field | Business Center Section | Field Name | REST API Field | Type |
Payment Information | Payment Type | subscriptition_paymentMethod | Payment Details | Payment Methods | — | Payment Information | Payment Type | System automatically identifies the payment method
based on default payment instrument associated to the customer token
specified in the subscription. | Payment Information |
Credit Card Number | card_accountNumber | Payment Details / Card Details | Card Number | — | Payment Information / Credit Card | Credit Card Number | card.number | Instrument Identifier | |
Card Type | card_cardType | Payment Details / Card Details | Card Types | — | Payment Information / Credit Card | Credit Card Type | card.type | Payment Instrument | |
— | card_cvIndicator | — | — | — | — | — | — | — | |
Card Verification Number | card_cvNumber | — | — | — | — | — | card.securityCode | Instrument Identifier | |
Card Expiry Date / Month | card_expirationMonth | Payment Details / Card Details | Expiry Month | — | Payment Information / Credit Card | Expiry Date | card.expirationMonth | Payment Instrument | |
Card Expiry Date / Year | card_expirationYear | Payment Details / Card Details | Expiry Year | — | Payment Information / Credit Card | Expiry Date | card.expirationYear | Payment Instrument | |
— | card_issueNumber | — | — | — | — | — | card.issueNumber | Payment Instrument | |
— | card_startMonth | — | — | — | — | — | card.startMonth | Payment Instrument | |
— | card_startYear | — | — | — | — | — | card.startYear | Payment Instrument | |
Date of Birth | billTo_dateOfBirth | Payment Details / echeck Details / Buyer's Details | Date of Birth | — | Payment Information / Check | Date of Birth | buyerInformation.dateOfBirth | Payment Instrument | |
Driving Licence Number | billTo_driversLicenseNumber | Payment Details / echeck Details / Buyer's Details | Driving Licence Number | — | Payment Information / Check | Driving Licence Number | buyerInformation.personalIdentification.id | Payment Instrument | |
County/Region | billTo_driversLicenseState | Payment Details / echeck Details / Buyer's Details | Drivining Licence State | — | Payment Information / Check | Driving Licence State | buyerInformation.personalIdentification.issuedBy.administrativeArea | Payment Instrument | |
Account Number | check_accountNumber | Payment Details / echeck Details | Account Number | — | Payment Information / Check | Account Number | bankAccount.number | Instrument Identifier | |
Account Type | check_accountType | Payment Details / echeck details | Account Type | — | Payment Information / Check k | Account Type | bankAccount.type | Payment Instrument | |
Cheque Routing Number | check_bankTransitNumber | Payment Details / echeck details | Routing Number | — | Payment Information / Check | Routing Number | bankAccount.routingNumber | Instrument Identifier | |
SEC Code | check_secCode | Payment Details / echeck details | Authorization Method (SEC Code) | — | Payment Information / Check | SEC Value | processingInformation.bankTransferOptions.SECCode | Payment Instrument | |
Bill Payment with Visa | recurringSubscriptionInfo_billPayment | — | — | — | — | — | processingInformation.billPaymentProgramEnabled | Payment Instrument | |
— | paymentNetworkToken_requestorID | — | — | — | — | — | card.tokenizedInformation.requestorID | PaymentInstrument | |
— | paymentNetworkToken_transactionType | — | — | — | — | — | card.tokenizedInformation.transactionType | PaymentInstrument | |
Legacy Recurring Billing | New Recurring Billing | Token Management Service | |||||||
Business Center Section | Field Name | Simple Order API Field | Business Center Section | Field Name | REST API Field | Business Center Section | Field Name | REST API Field | Type |
Order Information | Merchant Reference Number | merchantReferenceCode | Subscription Details | Merchant Reference Number | clientReferenceInformation.code | Customer Details | Merchant Reference Number | clientReferenceInformation.code | Customer Token |
Merchant Defined Data Field 1 | merchantDefinedData_field1 | Customer Details | Merchant-Defined 1 | — | Merchant-Defined Data Fields | Merchant-Defined 1 | merchantDefinedInformation.[name] | Customer Token | |
Merchant Defined Data Field 2 | merchantDefinedData_field2 | Customer Details | Merchant-Defined 2 | — | Merchant-Defined Data Fields | Merchant-Defined 2 | merchantDefinedInformation.[name] | Customer Token | |
Merchant Defined Data Field 3 | merchantDefinedData_field3 | Customer Details | Merchant-Defined 3 | — | Merchant-Defined Data Fields | Merchant-Defined 3 | merchantDefinedInformation.[name] | Customer Token | |
Merchant Defined Data Field 4 | merchantDefinedData_field4 | Customer Details | Merchant-Defined 4 | — | Merchant-Defined Data Fields | Merchant-Defined 4 | merchantDefinedInformation.[name] | Customer Token | |
Comments | — | — | — | — | — | — | objectInformation.comment | Customer Token | |
Legacy Recurring Billing | New Recurring Billing | Token Management Service | |||||||
Business Center Section | Field Name | Simple Order API Field | Business Center Section | Field Name | REST API Field | Business Center Section | Field Name | REST API Field | Type |
Shipping Information | City | shipTo_city | Shipping Address Details | City | — | Shipping Information | City | shipTo.locality | Shipping Address |
Shipping Countries | shipTo_country | Shipping Address Details | Country | — | Shipping Information | Country | shipTo.country | Shipping Address | |
First Name | shipTo_firstName | Shipping Address Details | First Name | — | Shipping Information | First Name | shipTo.firstName | Shipping Address | |
Last Name | shipTo_lastName | Shipping Address Details | Last Name | — | Shipping Information | Last Name | shipTo.lastName | Shipping Address | |
— | shipTo_phoneNumber | Shipping Address Details | Phone | — | Shipping Information | Phone Number | shipTo.phoneNumber | Shipping Address | |
Postal Code | shipTo_postalCode | Shipping Address Details | Zip/Postal Code | — | Shipping Information | Postal Code | shipTo.postalCode | Shipping Address | |
State | shipTo_state | Shipping Address Details | County/Region | — | Shipping Information | County/Region | shipTo.administrativeArea | Shipping Address | |
Street Address 1 | shipTo_street1 | Shipping Address Details | Address | — | Shipping Information | Street Address 1 | shipTo.address1 | Shipping Address | |
Street Address 2 | shipTo_street2 | Shipping Address Details | Flat, Suite, Floor, Building, etc. | — | Shipping Information | Street Address 2 | shipTo.address2 | Shipping Address | |
Legacy Recurring Billing | New Recurring Billing | Token Management Service | |||||||
Business Center Section | Field Name | Simple Order API Field | Business Center Section | Field Name | REST API Field | Business Center Section | Field Name | REST API Field | Type |
Installment | Title | subscription_title | Subscription Details | Subscription Name | subscriptionInformation.name | — | — | — | — |
— | paySubscriptionCreateService_disableAutoAuth | — | — | — | — | — | — | — | |
— | paySubscriptionCreateService_paymentRequestID | — | — | subscriptionInformation.originalTransactionId | — | — | — | — | |
Currency | purchaseTotals_currency | Subscription Details / Subscription Billing Plan | Currency | orderInformation.amountDetails.currency | — | — | — | — | |
Recurring Amount | purchaseTotals_grandTotalAmount | Subscription Details / Subscription Billing Plan | Billing Amount | orderInformation.amountDetails.billingAmount | — | — | — | — | |
Set-up Fee | recurringSubscriptionInfo_amount | Subscription Details / Subscription Billing Plan | Set-up fee | orderInformation.amountDetails.setupFee | — | — | — | — | |
Automatically renew this subscription | recurringSubscriptionInfo_automaticRenew | — | — | — | — | — | — | — | |
Billing Frequency | recurringSubscriptionInfo_frequency | Subscription Details / Subscription Billing Plan | Billing Frequency | planInformation.billingPeriod.length +
planInformation.billingPeriod.unit If you want to
create a token for on-demand payments you need to use TMS API or
Payments API with Token Creation. | — | — | — | — | |
Number of Payments | recurringSubscriptionInfo_numberOfPayments | Subscription Details / Subscription Billing Plan | Billing Cycles | planInformation.billingCycles.total | — | — | — | — | |
Start Date | recurringSubscriptionInfo_startDate | Subscription Details | Start Date | subscriptionInformation.startDate | — | — | — | — | |
Ignore Fraud Checks | decisionManager_enabled
| Decision Manager is not supported when creating a subscription with
automatic processing of the initial transaction. If you want to use
Decision Manager , process the initial transaction yourself
and then include its Network Transaction ID in your request in the
subscriptionInformation.originalTransactionId
field. | |||||||
— | ccAuthService_commerceIndicator
| If you are using
the Recurring Billing REST API to create a subscription and you do not
process the initial transaction yourself, include the
processingInformation.commerceIndicator field. To
ensure SCA/3DS compliance, process the initial transaction yourself and
then include its Network Transaction ID in your request in the
subscriptionInformation.originalTransactionId
field. | |||||||
recurringSubscriptionInfo_subscriptionID
| The new Recurring Billing and subscriptions service uses a REST API.
Each available action on a subscription has its own dedicated
endpoint. To perform an action, specify the subscription ID as a
path parameter. For specific information, see the Recurring Billing
Developer Guide . | ||||||||
paySubscriptionEventUpdateService_action
| |||||||||
paySubscriptionEventUpdateService_event_amount
| |||||||||
paySubscriptionEventUpdateService_event_approvedBy
| |||||||||
paySubscriptionEventUpdateService_event_number
| |||||||||
recurringSubscriptionInfo_numberOfPaymentsToAdd
| |||||||||
recurringSubscriptionInfo_status
| |||||||||
Upgraded Report Fields
The upgraded Recurring Billing service introduces a new report that includes fields
supporting new features and functionality. Both the legacy report and the new report are
accessed through the
Business Center
UI.Fields in the Legacy Subscription Detail Reports | Fields in the New Recurring Billing Detail Report | Comment |
|---|---|---|
CustomerAccountID | — | |
RecurringPaymentEventAmount | — | |
RecurringPaymentAmount | SubscriptionPaymentAmount | |
SubscriptionTitle | SubscriptionName | |
SubscriptionStatus | SubscriptionStatus | |
SubscriptionPaymentMethod | — | |
RecurringStartDate | SubscriptionStartDate | |
RecurringNumberOfPayments | BillingCycles | |
RecurringFrequency | BillingPeriodUnit , BillingPeriodLength | |
RecurringApprovalRequired | — | |
RecurringPaymentEventApprovedBy | — | |
RecurringAutomaticRenew | — | |
SetupFee | SetupFee | |
SetupFeeCurrency | — | |
SubscriptionType | — | |
LastSubscriptionStatus | — | |
NextScheduledDate | SubscriptionNextPaymentDate | |
EventRetryCount | SubscriptionRetryCount | |
PaymentsSuccess | — | |
PaymentSuccessAmount | — | |
InstallmentSequence | — | |
InstallmentTotalCount | — | |
RequestID | RequestID | |
SubscriptionID | TMSCustomerID | |
TransactionDate | RequestDate | |
MerchantRefNo | — | |
TransRefNo | TransactionReferenceNumber | |
EcommerceIndicator | ApplicationName | |
BillToFirstName | BillTo_FirstName | |
BillToLastName | BillTo_LastName | |
BillToAddress1 | BillTo_Address1 | |
BillToAddress2 | BillTo_Address2 | |
BillToCity | BillTo_City | |
BillToState | BillTo_State | |
BillToZip | BillTo_Zip | |
BillToCountry | BillTo_Country | |
BillToCompanyName | — | |
BillToEmail | BillTo_Email | |
ConsumerPhone | BillTo_Phone | |
IPAddress | — | |
ShipToFirstName | — | |
ShipToLastName | — | |
ShipToAddress1 | — | |
ShipToAddress2 | — | |
ShipToCity | — | |
ShipToState | — | |
ShipToZip | — | |
ShipToCountry | — | |
ShipToCompanyName | — | |
CardType | CardType | |
CustomerCCExpiryMonth | ExpirationMonth | |
CustomerCCExpiryYear | ExpirationYear | |
CustomerCCStartMonth | — | |
CustomerCCStartYear | — | |
CustomerCCIssueNo | — | |
CustomerCCAccountSuffix | — | |
CustomerCCSubTypeDescription | — | |
CustomerCCRoutingNumber | — | |
Applications | — | |
PaymentProcessor | — | |
CurrencyCode | CurrencyCode | |
ReasonCode | — | |
AuthRCode | — | |
AuthCode | AuthorizationCode | |
AuthType | — | |
AuthAVSResults | — | |
AuthResponseCode | — | |
AuthCardVerificationResult | — | |
RCode | — | |
RFlag | — | |
RMsg | — | |
RequestToken | — | |
MerchantDefinedData1 | — | |
MerchantDefinedData2 | — | |
MerchantDefinedData3 | — | |
MerchantDefinedData4 | — | |
TaxAmount | — | |
Comments | — | |
MerchantSecureData1 | — | |
MerchantSecureData2 | — | |
MerchantSecureData3 | — | |
MerchantSecureData4 | — | |
MerchantID | MerchantID | |
— | PlanCurrency | New field |
— | PlanCode | New field |
— | PlanName | New field |
— | SurchargeAmount | New field |
— | SurchargeDescription | New field |
— | TMSPaymentInstrumentID | New field |
— | TMSShippingID | New field |
— | SubscriptionID | New field |
— | SubscriptionCode | New field |
— | AccountSuffix | New field |
Migration Activities
Migration to the upgraded Recurring Billing service is a shared process. Cybersource
prepares your account and data for migration, while you update your internal processes and
order management system to support the upgraded service. This section describes the activities
involved, including Preparation, Prerequisites, Timeline, Test Checklist Recommendations, and
Updating Your Processes and Order Management System.
The Timeline section includes a visual graphic that shows key tasks and associated
timelines, helping you understand how the activities align and what is required to be ready to
upgrade.
IMPORTANT
In some cases, the integration method you currently use to create subscriptions cannot be
automatically determined. Review all available action cohorts to identify the one that best
matches your implementation, and follow the corresponding upgrade path.
Preparation
Cybersource
will inform you of migration timelines and expectations.
Cybersource
will migrate all legacy Secure Storage tokens to TMS
. Only active subscriptions will be migrated to the upgraded Recurring Billing service.
Cancelled subscriptions and completed subscriptions will not be migrated. However,
Cybersource
will continue to provide access to those subscriptions through the
Business Center
, the REST API, and TMS
. IMPORTANT
When migration begins, your current integration will fail. Prepare and deploy changes
to your site in advance.
Prerequisites
Before you begin using the upgraded Recurring Billing service, complete these prerequisites:
- Understand how you currently use the legacy Recurring Billing service.
- Understand the actions thatCybersourcerequires you, and if applicable your reseller, to take.
- Integrate with the upgraded Recurring Billing service using the REST API.
- Integrate with Payments using the REST API.
- Become familiar with theBusiness Centerfor the upgraded Recurring Billing service.
- ContactCybersourcecustomer support to begin migrating your legacy Recurring Billing data (tokens and subscriptions) to the new Recurring Billing service.
IMPORTANT
Cybersource
migrates all Active and Hold legacy Recurring Billing tokens to the upgraded
Recurring Billing solution. Cancelled and Completed subscriptions are not included in
the migration.
IMPORTANT
Review the migration Test Checklist to ensure that all pre- and post-payment processing
processes work correctly with the new system.
Timeline
Migrating from the legacy Recurring Billing service to the upgraded Recurring Billing service
takes a few weeks. The timeline graphic provides a visual overview of the key tasks and their
associated timeframes, helping you understand how the activities progress and what is required
to be ready to upgrade.
Figure:
Recurring Billing Migration Timeline

Test Checklist Recommendations
After
Cybersource
notifies you that your upgrade and migration is
complete in the test environment, verify that your internal processes, located outside of
Cybersource
systems remain unaffected.- For subscriptions that transitioned from the legacy system to the new system, perform these checks:
- Spot check that subscription states transitioned correctly.
- Spot check that the subscription amounts transitioned correctly.
- Confirm that the Next Billing dates of subscriptions transitioned correctly.
- For subscription creation and management, perform these actions:
- Create a test subscription from a token. For more information, see Payment Synchronization Period.
- Update details of an existing test subscription.
- Cancel a subscription.
- Make sure you have a thorough understanding of these things in your system:
- Existing configuration in the legacy system.
- Integration between yourCybersourcesystems and external systems.
- Connections to other systems.
- Data flow between systems.
Update Your Processes and Order Management System
To upgrade to the new Recurring Billing service, you must update your internal processes and
order management system.
Merchants are grouped into six categories (action cohorts) based on the legacy Recurring
Billing integration method they use. Each group follows a different set of upgrade steps, as
described in these sections:
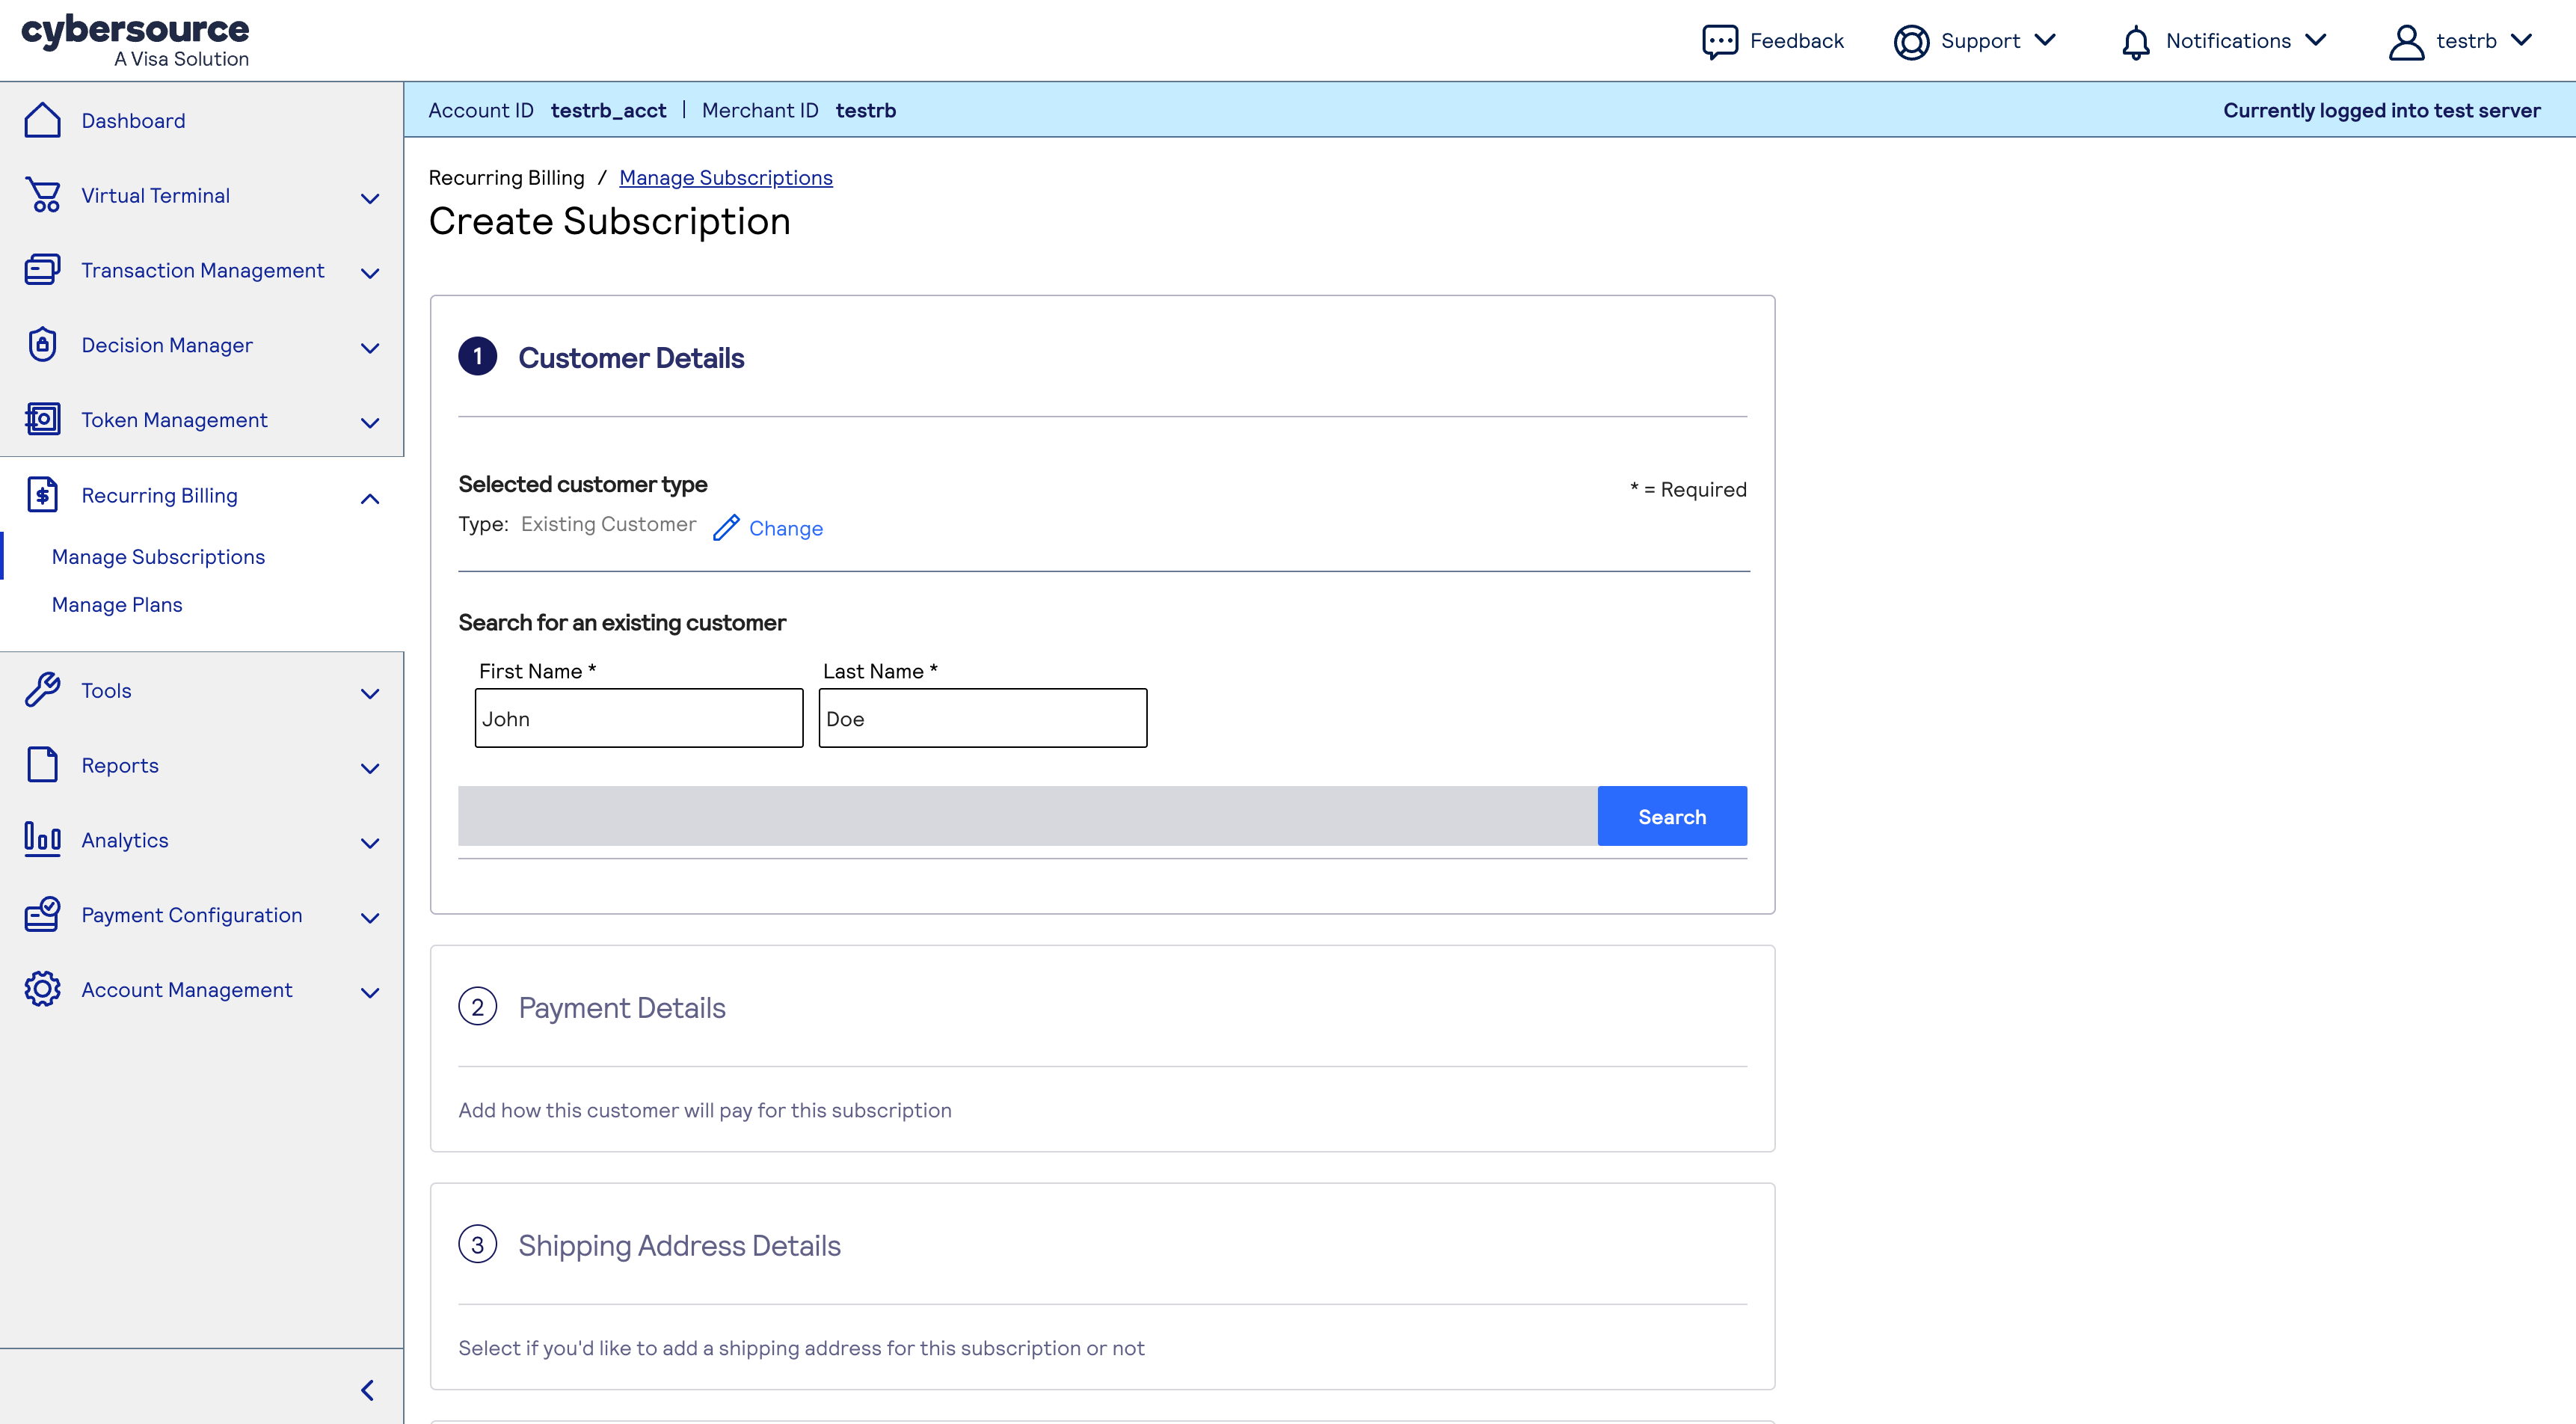
Business Center User Interface
Business Center
User InterfaceIf you use Recurring Billing the
Business Center
service to create and
maintain subscriptions, you can continue to do so after your existing subscription tokens
are migrated to the upgraded Recurring Billing and TMS
in the
Business Center
. No API integration updates are required.To prepare for your upgrade:
- Become familiar with the new Recurring Billing service user interface in theBusiness Center.
- ContactCybersourceclient services to start the migration.
Figure:
Upgraded Recurring Billing User Interface

Related Information
Business Center Virtual Terminal
Business Center
Virtual TerminalIf you use the Virtual Terminal to create tokens during one-time payments and to
create and maintain subscriptions, you can continue to do so after your existing
subscription tokens are migrated to the upgraded Recurring Billing service and
TMS
in the Business Center
. No API integration updates are required.Follow these steps to prepare for the migration:
- Become familiar with the new Recurring Billing service user interface in theBusiness Center.
- Become familiar with the new Recurring Billing two-step process for creating subscriptions.
- ContactCybersourceclient services to start the migration.
Related Information
Business Center Transaction Management
Business Center
Transaction ManagementIf you use
Business Center
Transaction Management to create subscriptions,
follow these steps to prepare for the migration: - Become familiar with the new Recurring Billing service user interface in theBusiness Center.
- NAvigate to the the Transaction Details screen.
- SelectActionand thenCreate Subscriptionon . The system will direct you to the new Recurring Billing service user interface in theBusiness Center.
- ContactCybersourceclient services to start the migration.
Related Information
SCMP API and Simple Order API
IMPORTANT
If you use the SCMP API or Simple Order API to create and manage
subscriptions, you must migrate to the Recurring Billing service that uses the REST
API.
Follow these steps to prepare for the migration:
- Exchange your current SCMP API or SOAP API integration with Payments REST API to perform the transaction that initializes the subscription agreement and creates a validated token.
- Integrate to the new Recurring Billing service that uses the REST API.
- Become familiar with the new Recurring Billing service user interface in theBusiness Center.
- ContactCybersourceclient services to start the migration.
You can still use the SCMP API or Simple Order API, but only to perform the transaction that
initializes the subscription agreement and creates a validated token. It replaces step 1 in
the list above.
To make this possible, you need to change the
recurring_frequency
field in the request to
on-demand. Additionally, remove any other subscription‑related fields (recurring_*
) from the
request.After completing this initial transaction, you can proceed to create the subscription using
the REST API in the upgraded Recurring Billing system.
IMPORTANT
If you choose to stay with Simple Order API, make sure your keys are up
to date.
Secure Acceptance Hosted Checkout Integration and Checkout API
Hosted Checkout Integration
and Checkout API
IMPORTANT
After migration, you can no longer create subscriptions using
Hosted Checkout Integration
or Checkout API
. To create and manage
subscriptions, you must migrate to the Recurring Billing service that uses the REST
API.Follow these steps to prepare for the migration:
- Integrate to Unified Checkout to collect the payment instrument.
- Integrate to Payments REST API to create the Customer Token from the Transient Token.
- Integrate to the new Recurring Billing service that uses the REST API.
- Become familiar with the new Recurring Billing service user interface in theBusiness Center.
- Contact Cybersource client services to start the migration.
You can still use the Hosted Checkout Integration or Checkout API, but only to perform the
transaction that initializes the subscription agreement and creates a validated token. It
replaces steps 1 and 2 in the list above. To create a token in this way, change the
recurring_frequency
request field value to on-demand
. You must also remove any other
subscription-related fields, such as recurring_*
from the request. After completing this initial
transaction, you can proceed to create the subscription using the REST API in the upgraded
Recurring Billing system.Aura and Cold Fusion
If you use Aura or Cold Fusion to create and manage subscriptions, you must migrate to
Recurring Billing service that uses the REST API.
After your existing subscription tokens are migrated to the upgraded Recurring Billing
and
TMS
in the Business Center
, you can create and
manage subscriptions there. Follow these steps to prepare for the migration:
- Integrate to the new Recurring Billing service that uses the REST API.
- Become familiar with the new Recurring Billing service user interface in theBusiness Center.
- ContactCybersourceclient services to start the migration.
Related Information
Using the Recurring Billing Service After Migration
This section describes how using the Recurring Billing service after migration differs
from how you used the legacy Recurring Billing system.
Create a Subscription Using the API
You must use a customer token to create a subscription. After migration, a customer token
is created in
TMS
for each active subscription in the legacy system.
This token has the same ID as the subscription. You can use this token to create another
subscription for the same customer.To create a subscription for a new customer, you must generate a new customer token. To
capture payment card data for future use, validate the payment card account by using one of
these methods:
- Use a payment for a zero amount.
- If your processor does not support zero amount, use a minimal amount.
Enable the Data Enrichment for Card Verification feature to automatically choose the
minimal authorization amount. Contact Customer Support for more details.
The best way to perform this transaction is with the REST API. For more information, see
the .
Token Management Service
Developer
GuideYou can still use the Secure Acceptance Checkout or the SCMP or Simple Order API, but only to
perform the transaction that initializes the subscription agreement and creates a validated
token.
Follow these steps to create tokens using Secure Acceptance Checkout or the SCMP or
Simple Order API:
- Set the value of therecurring_frequencyrequest field toon-demand
- Remove any other subscription-related fields (field names that begin withrecurring_*) from the request message.
IMPORTANT
If you choose to continue using the Simple Order API, make sure your
keys are up to date.
Your current integration will fail after migration begins.
Prepare changes on your site in advance.
Before migration, create tokens as described above.
After migration, create subscriptions for them.
To create a subscription, use this data from the payment response:
Customer ID:
- Payments REST API:tokenInformation.customer.id
- Secure Acceptance Checkout:payment_token
- SCMP API:pay_subscription_create_subscription_id
- Simple Order API:paySubscriptionCreateReply_subscriptionID
Original Transaction ID:
- Payments REST API:processorInformation.networkTransactionId
- Secure Acceptance Checkout:payment_network_transaction_id
- SCMP API:auth_payment_network_transaction_id
- Simple Order API:ccAuthReply_paymentNetworkTransactionID
Original Transaction Authorized Amount
(Required only for Diners and Discover
cards)- Payments REST API:orderInformation.amountDetails.authorizedAmount
- Secure Acceptance Checkout:auth_amount
- SCMP API:auth_auth_amount
- Simple Order API:ccAuthReply_amount
For more information about creating a subscription, see the Create a Subscription section
in the
Recurring Billing User Guide
.Notifications
The new Recurring Billing service supports two customer notification methods: email and
webhooks. You can configure one or both notification methods.
Email Notifications to Customers
Notifications are sent automatically to the email address associated with the customer
token. They contain information from the plan and subscription details for a prepayment,
successful payment, or failed payment. Sending these notifications can be disabled in the
Recurring Billing settings.
Webhook Notifications to Merchants
Cybersource
offers a Webhooks REST API that you can use to receive notifications about
Recurring Billing events. Webhooks are automated notifications that are sent to you when
specific system events occur. By using the Webhooks REST API, you can subscribe to receive
these notifications for events of your choice and designate a URL in your system to receive
the notifications. You can configure your system to respond to the events in any way you
choose. This is helpful for events that are not a part of an API request and response, or
are not available through the Reporting API. For more information, see the Webhooks Implementation Guide.Create and manage webhook subscriptions for the Recurring Billing event types listed
in the table. In the webhooks request message, set the
productId
API
field to recurringBilling
. Set the eventTypes
API field
to one of the values listed in the Event Type column of the table.Product ID | Event Type | Description |
|---|---|---|
recurringBilling | rbs.subscriptions.charge.failed | Notifies the customer of a recurring payment failure. |
rbs.subscriptions.charge.pre-notified | Notifies the customer of an upcoming recurring
payment. | |
rbs.subscriptions.charge.created | Notifies the customer of a successful recurring
payment. |
You can use webhooks to customize your customer notifications. For more information,
go to the
Cybersource
API Developer Center. In the left navigation pane,
select Platform Services
> Webhooks
>
Create Webhook Security Keys
. Use the webhook request builder and
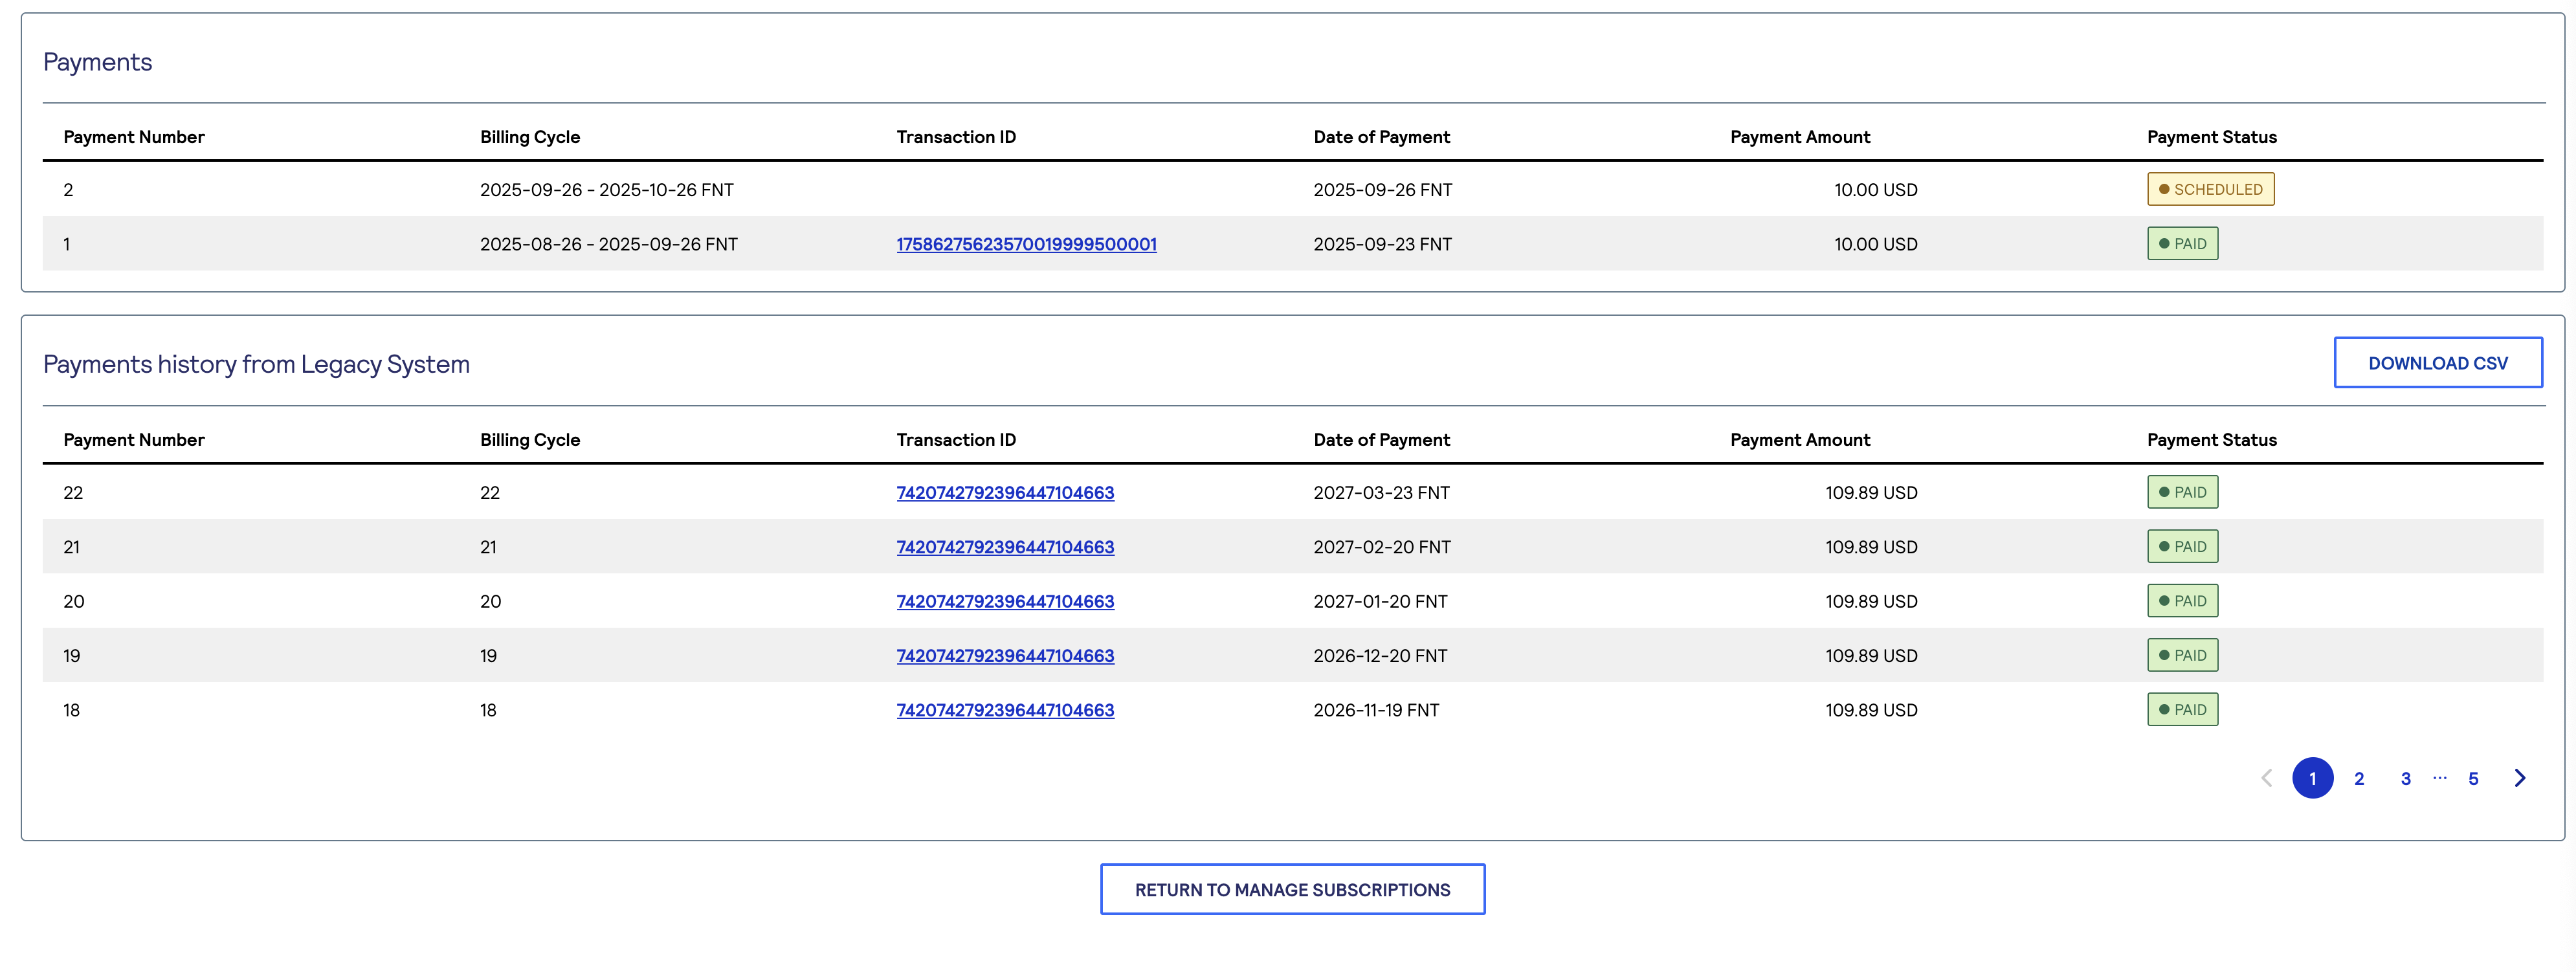
live console to test example REST API requests.Migrated Subscription Payment History
In the new Recurring Billing service, the Subscription Details section in the
Business Center
shows the payment history imported from the legacy system. It also shows the
subscription’s original start date and the total number of billing cycles completed in the
legacy Recurring Billing environment.This screenshot shows an example subscription payment history in the
Business Center
.
This screenshot shows an example of migrated subscription details in the
Business Center
: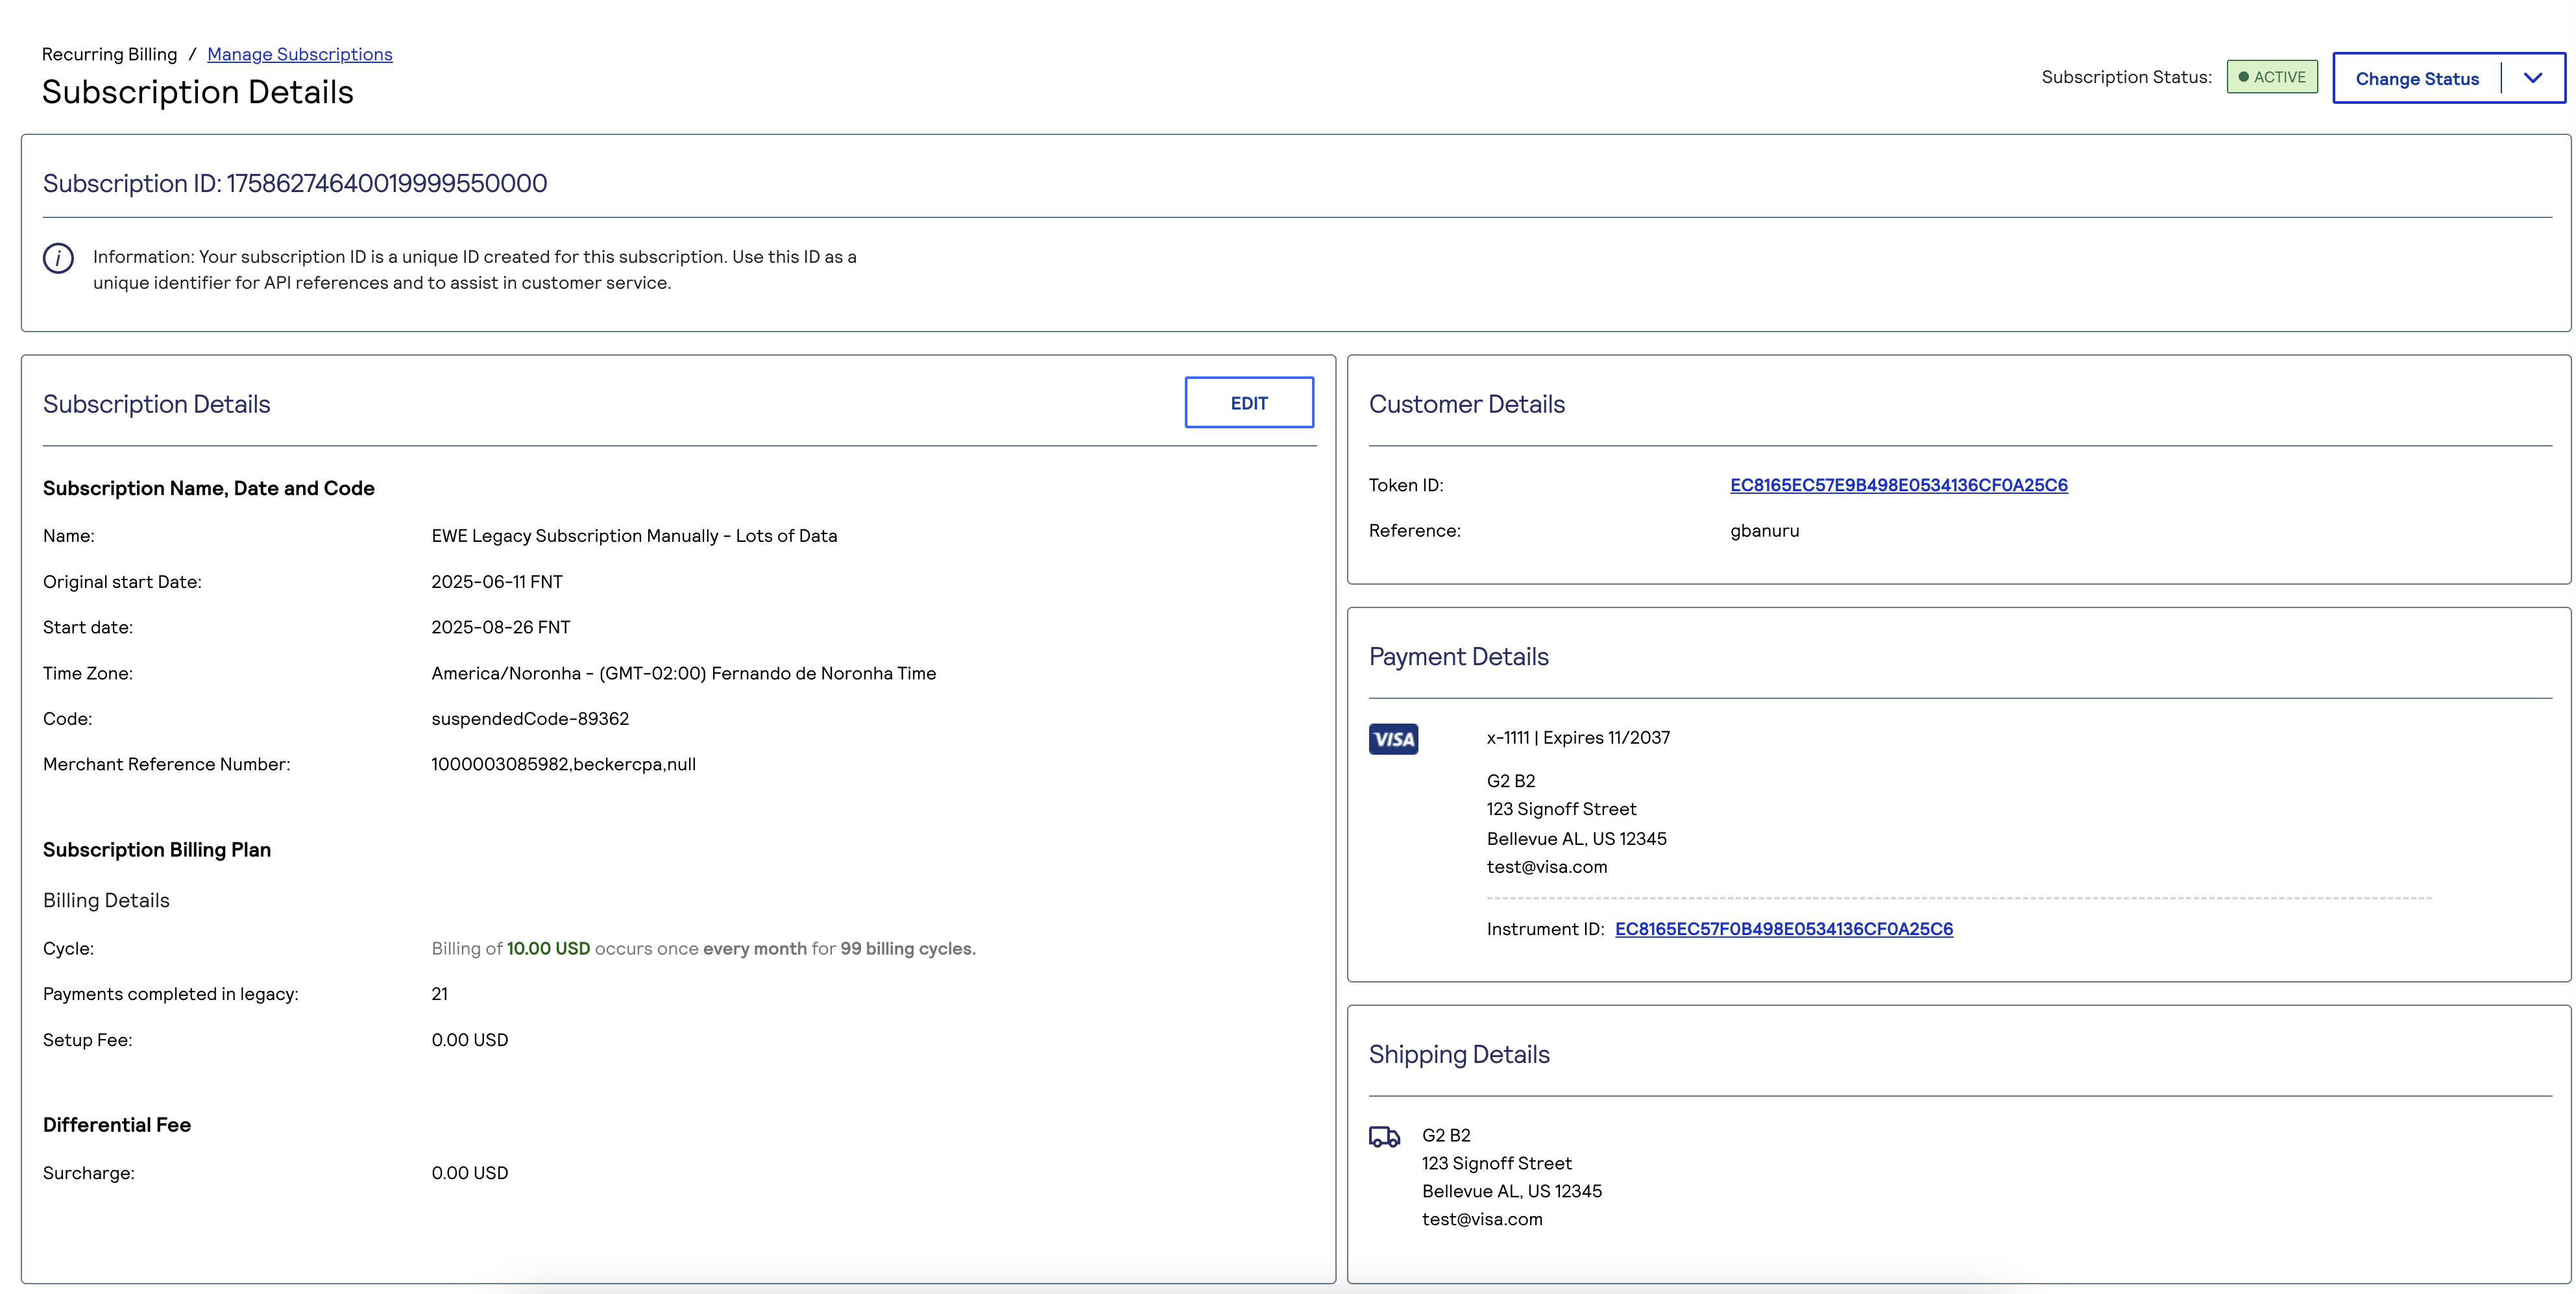
Subscription Details
These values on the Subscription Details screen identify the subscription:
- Subscription Code
- A unique code generated by the system when no input is provided. The code is incremented by a number for each new subscription created. It is a string of up to 10 numeric or alphanumeric characters and can include dash (-) and dot (.) characters.
- Subscription Name
- Any name used to uniquely identify a subscription.
- Subscription ID
- A system-generated identifier associated with the customer token.
- IMPORTANTA subscription ID in the new system is not the same as subscription ID in the legacy system. In the new system, the legacy Subscription ID is the Token ID.
- Merchant Reference Number
- A merchant-specified text string that uniquely identifies the customer. This identifier is used in the new system in the same way as it was used in the legacy system.
- IMPORTANTAfter migration, both the token and the subscription will have the same value. Because tokens and subscriptions are two different objects in the upgraded system, the Merchant Reference Number associated with a token may differ from the one associated with a subscription. For all payments triggered by Recurring Billing, the Merchant Reference Number is taken directly from the subscription details.
Payment Synchronization Period
IMPORTANT
During the first two weeks after migrating to the upgraded Recurring Billing
service, it is not possible to use the REST API to communicate with TMS. Instead, you can
use the Payments API to create and manage tokens. Take this limitation into account in your
integrations.
During the first two weeks after you migrate from legacy Recurring Billing service to the
new Recurring Billing service, these Recurring Billing functions are limited:
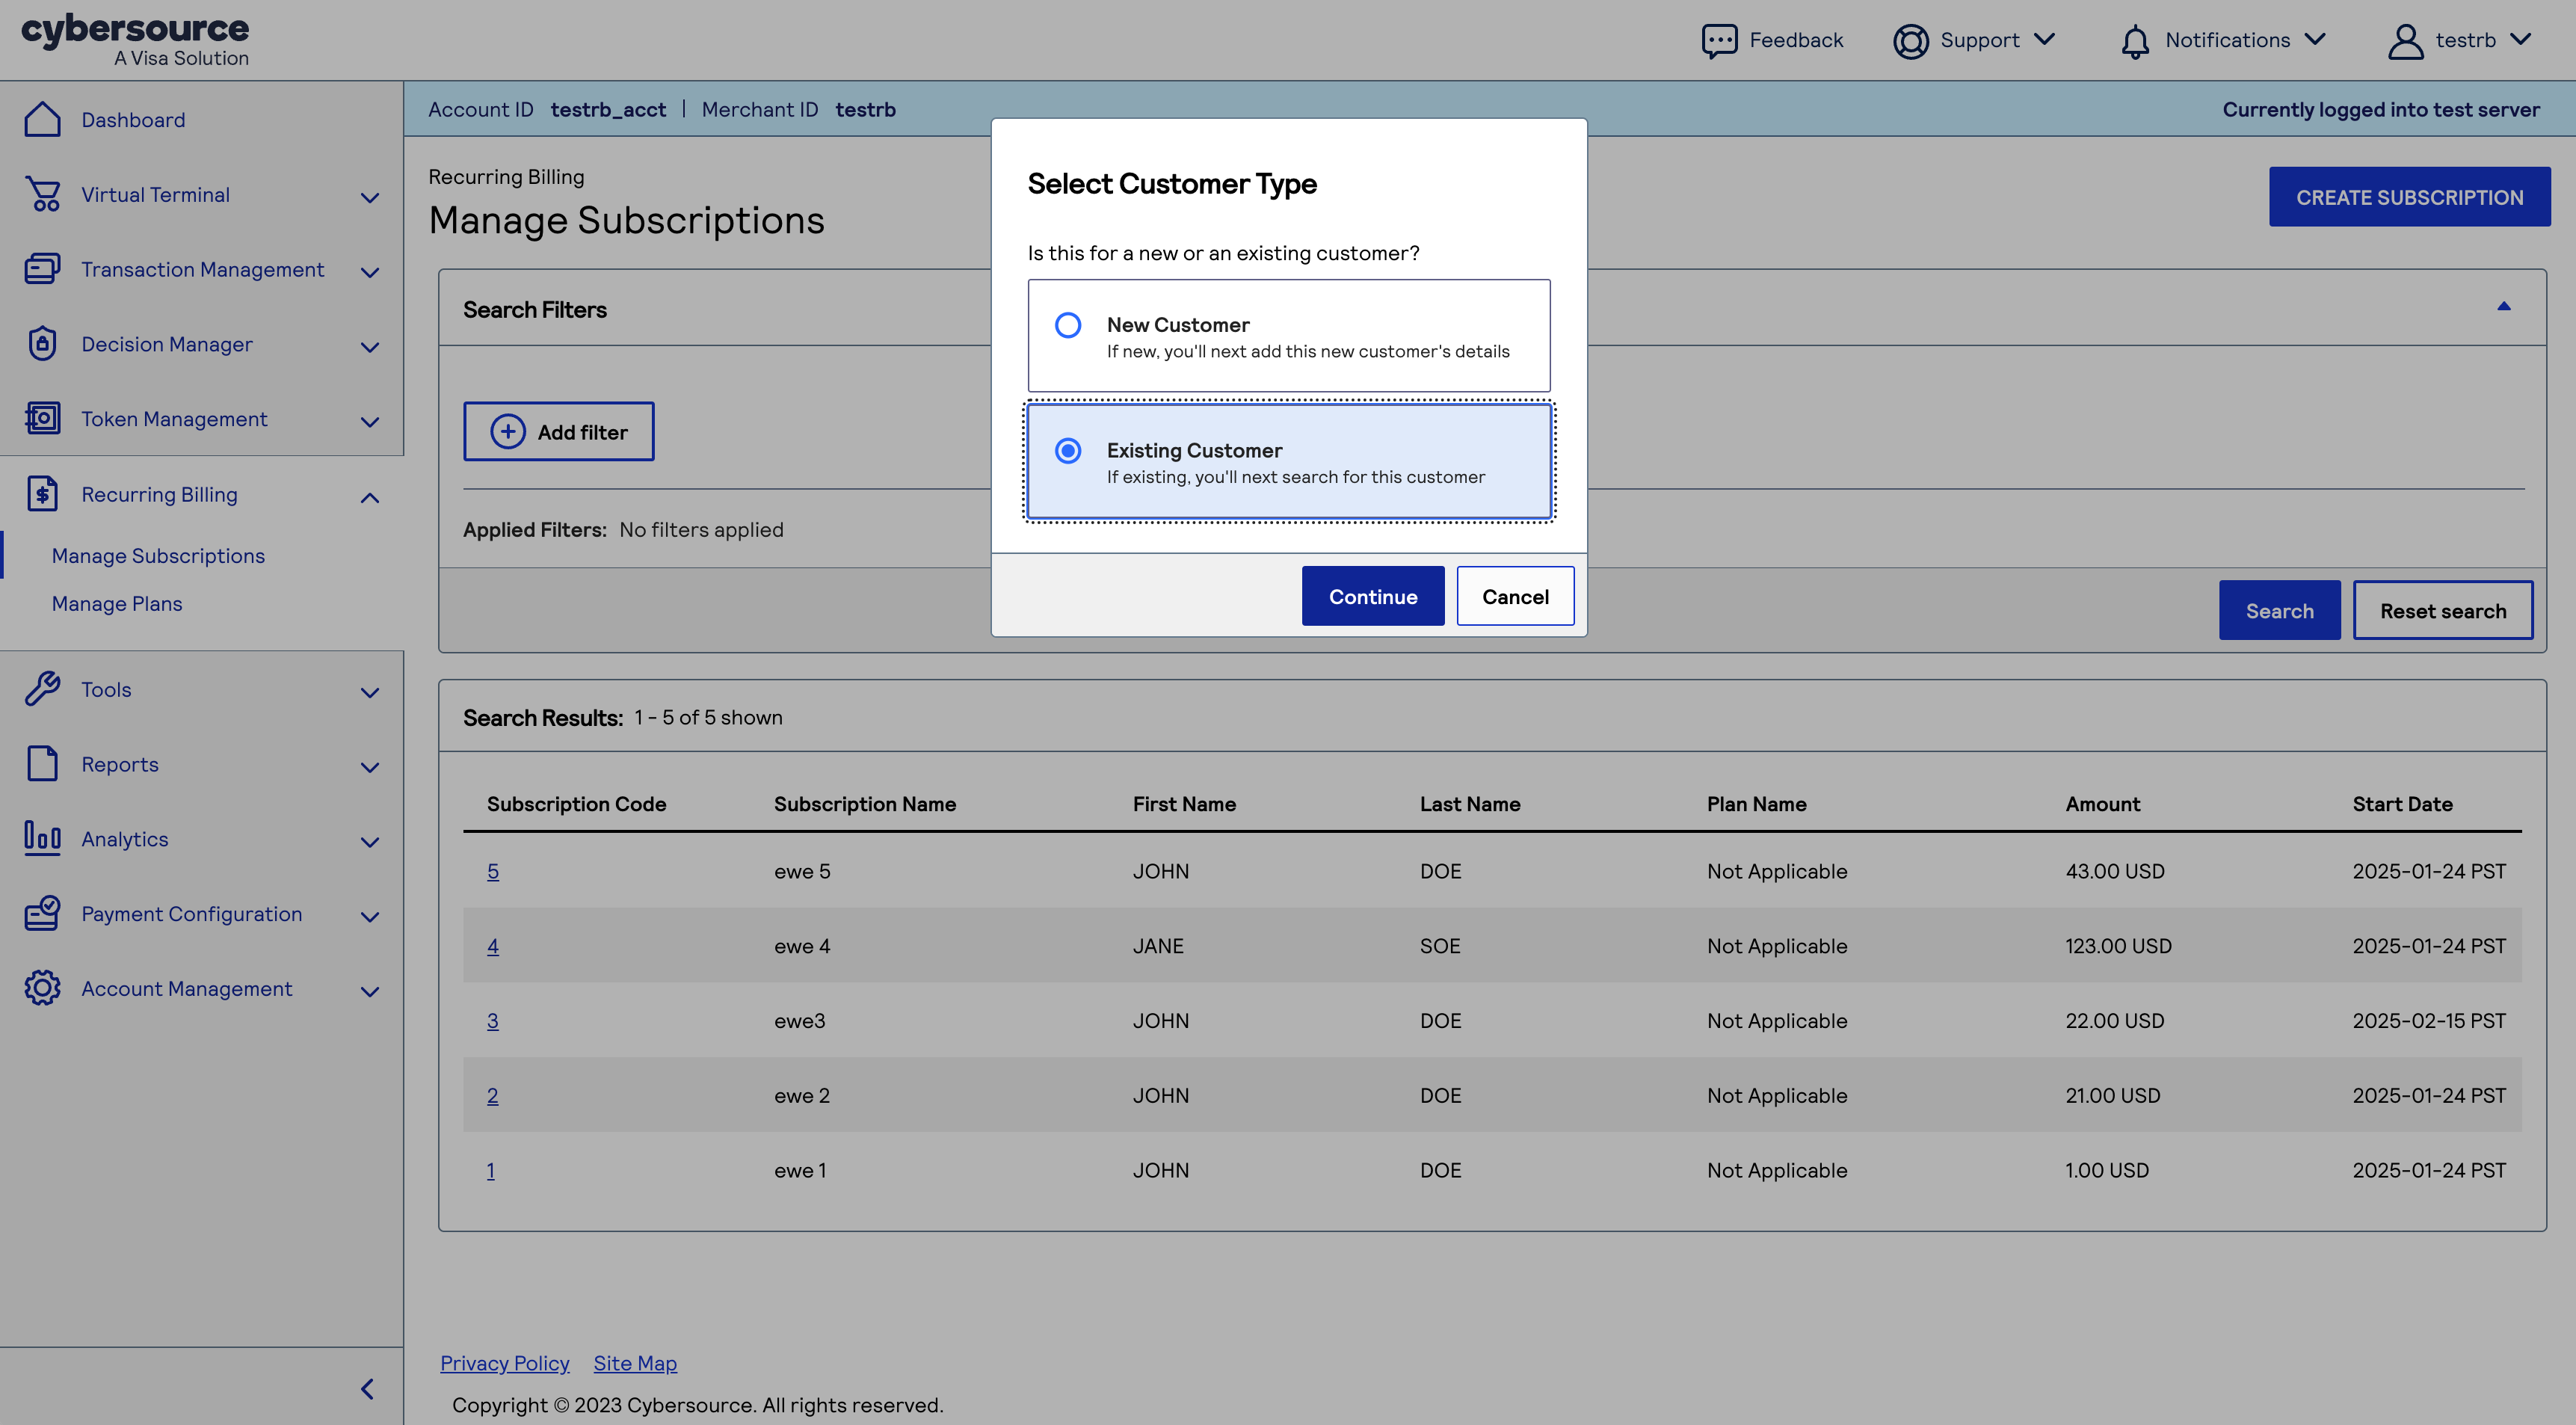
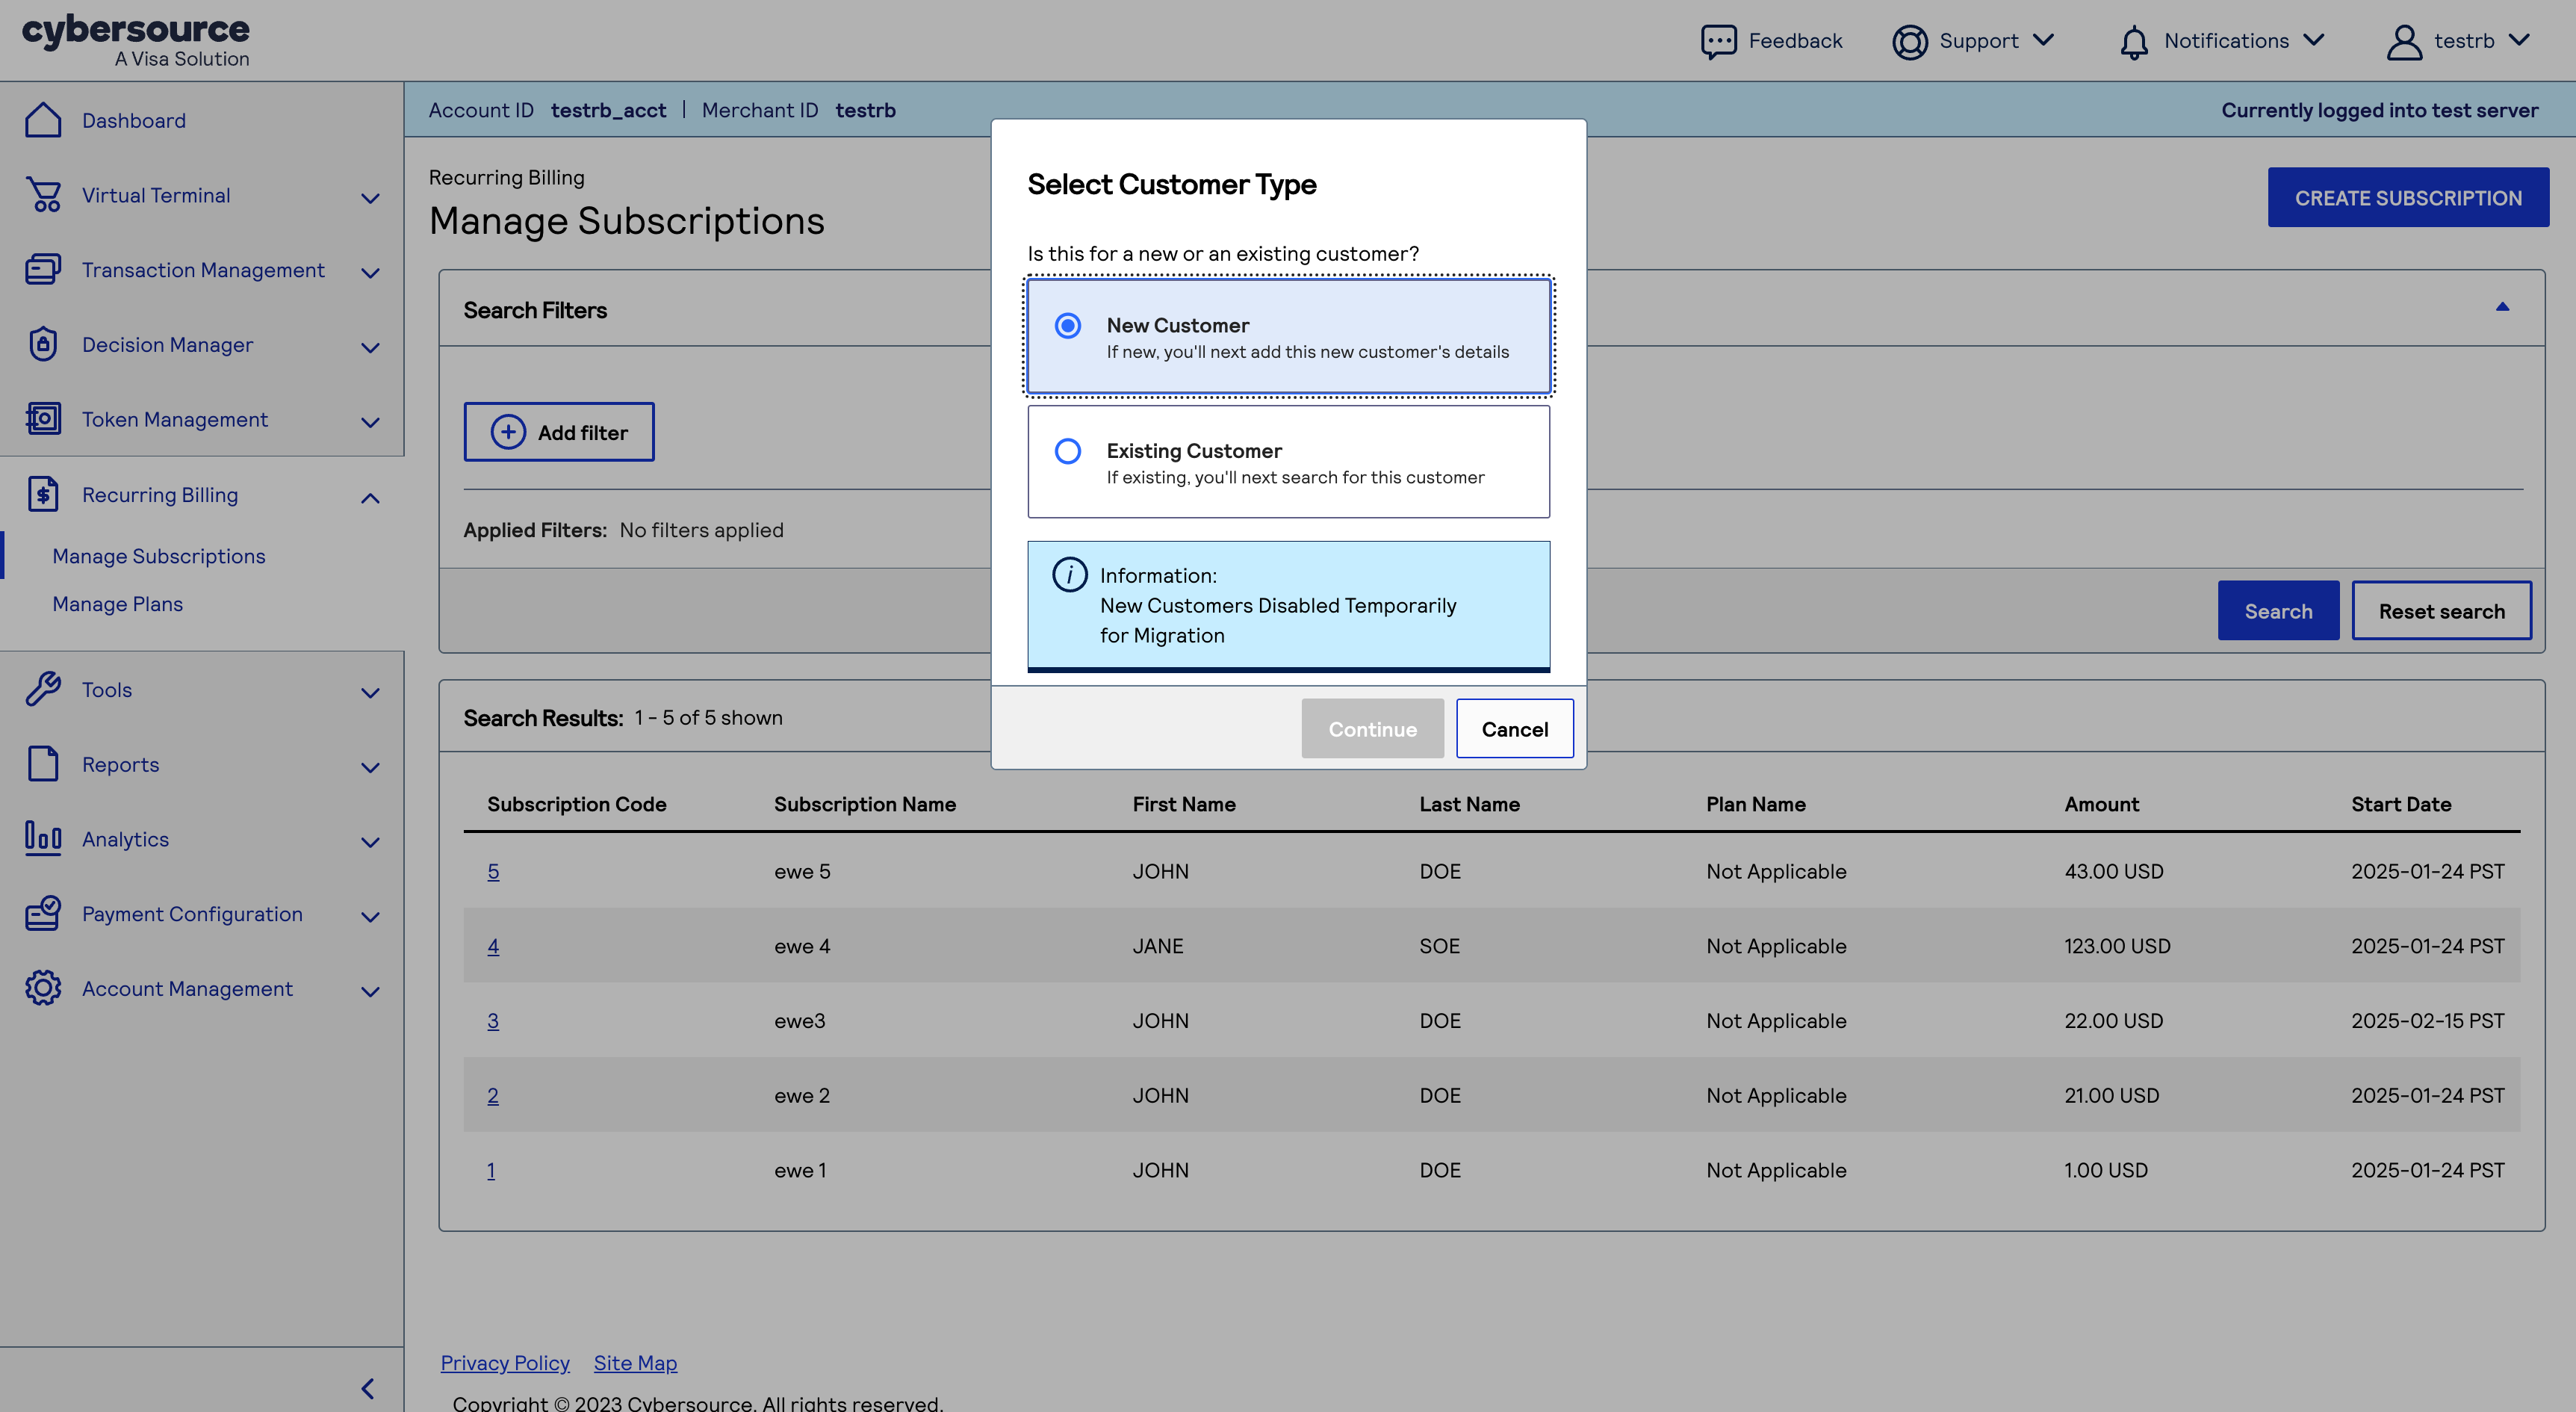
- Creating a Subscription with a New Customer Flow Using the Business Center
- During the payment synchronization period, you cannot use the new customer flow.
- This image is an example of the Select Customer Type dialog:
Figure:
Select Customer Type Dialog
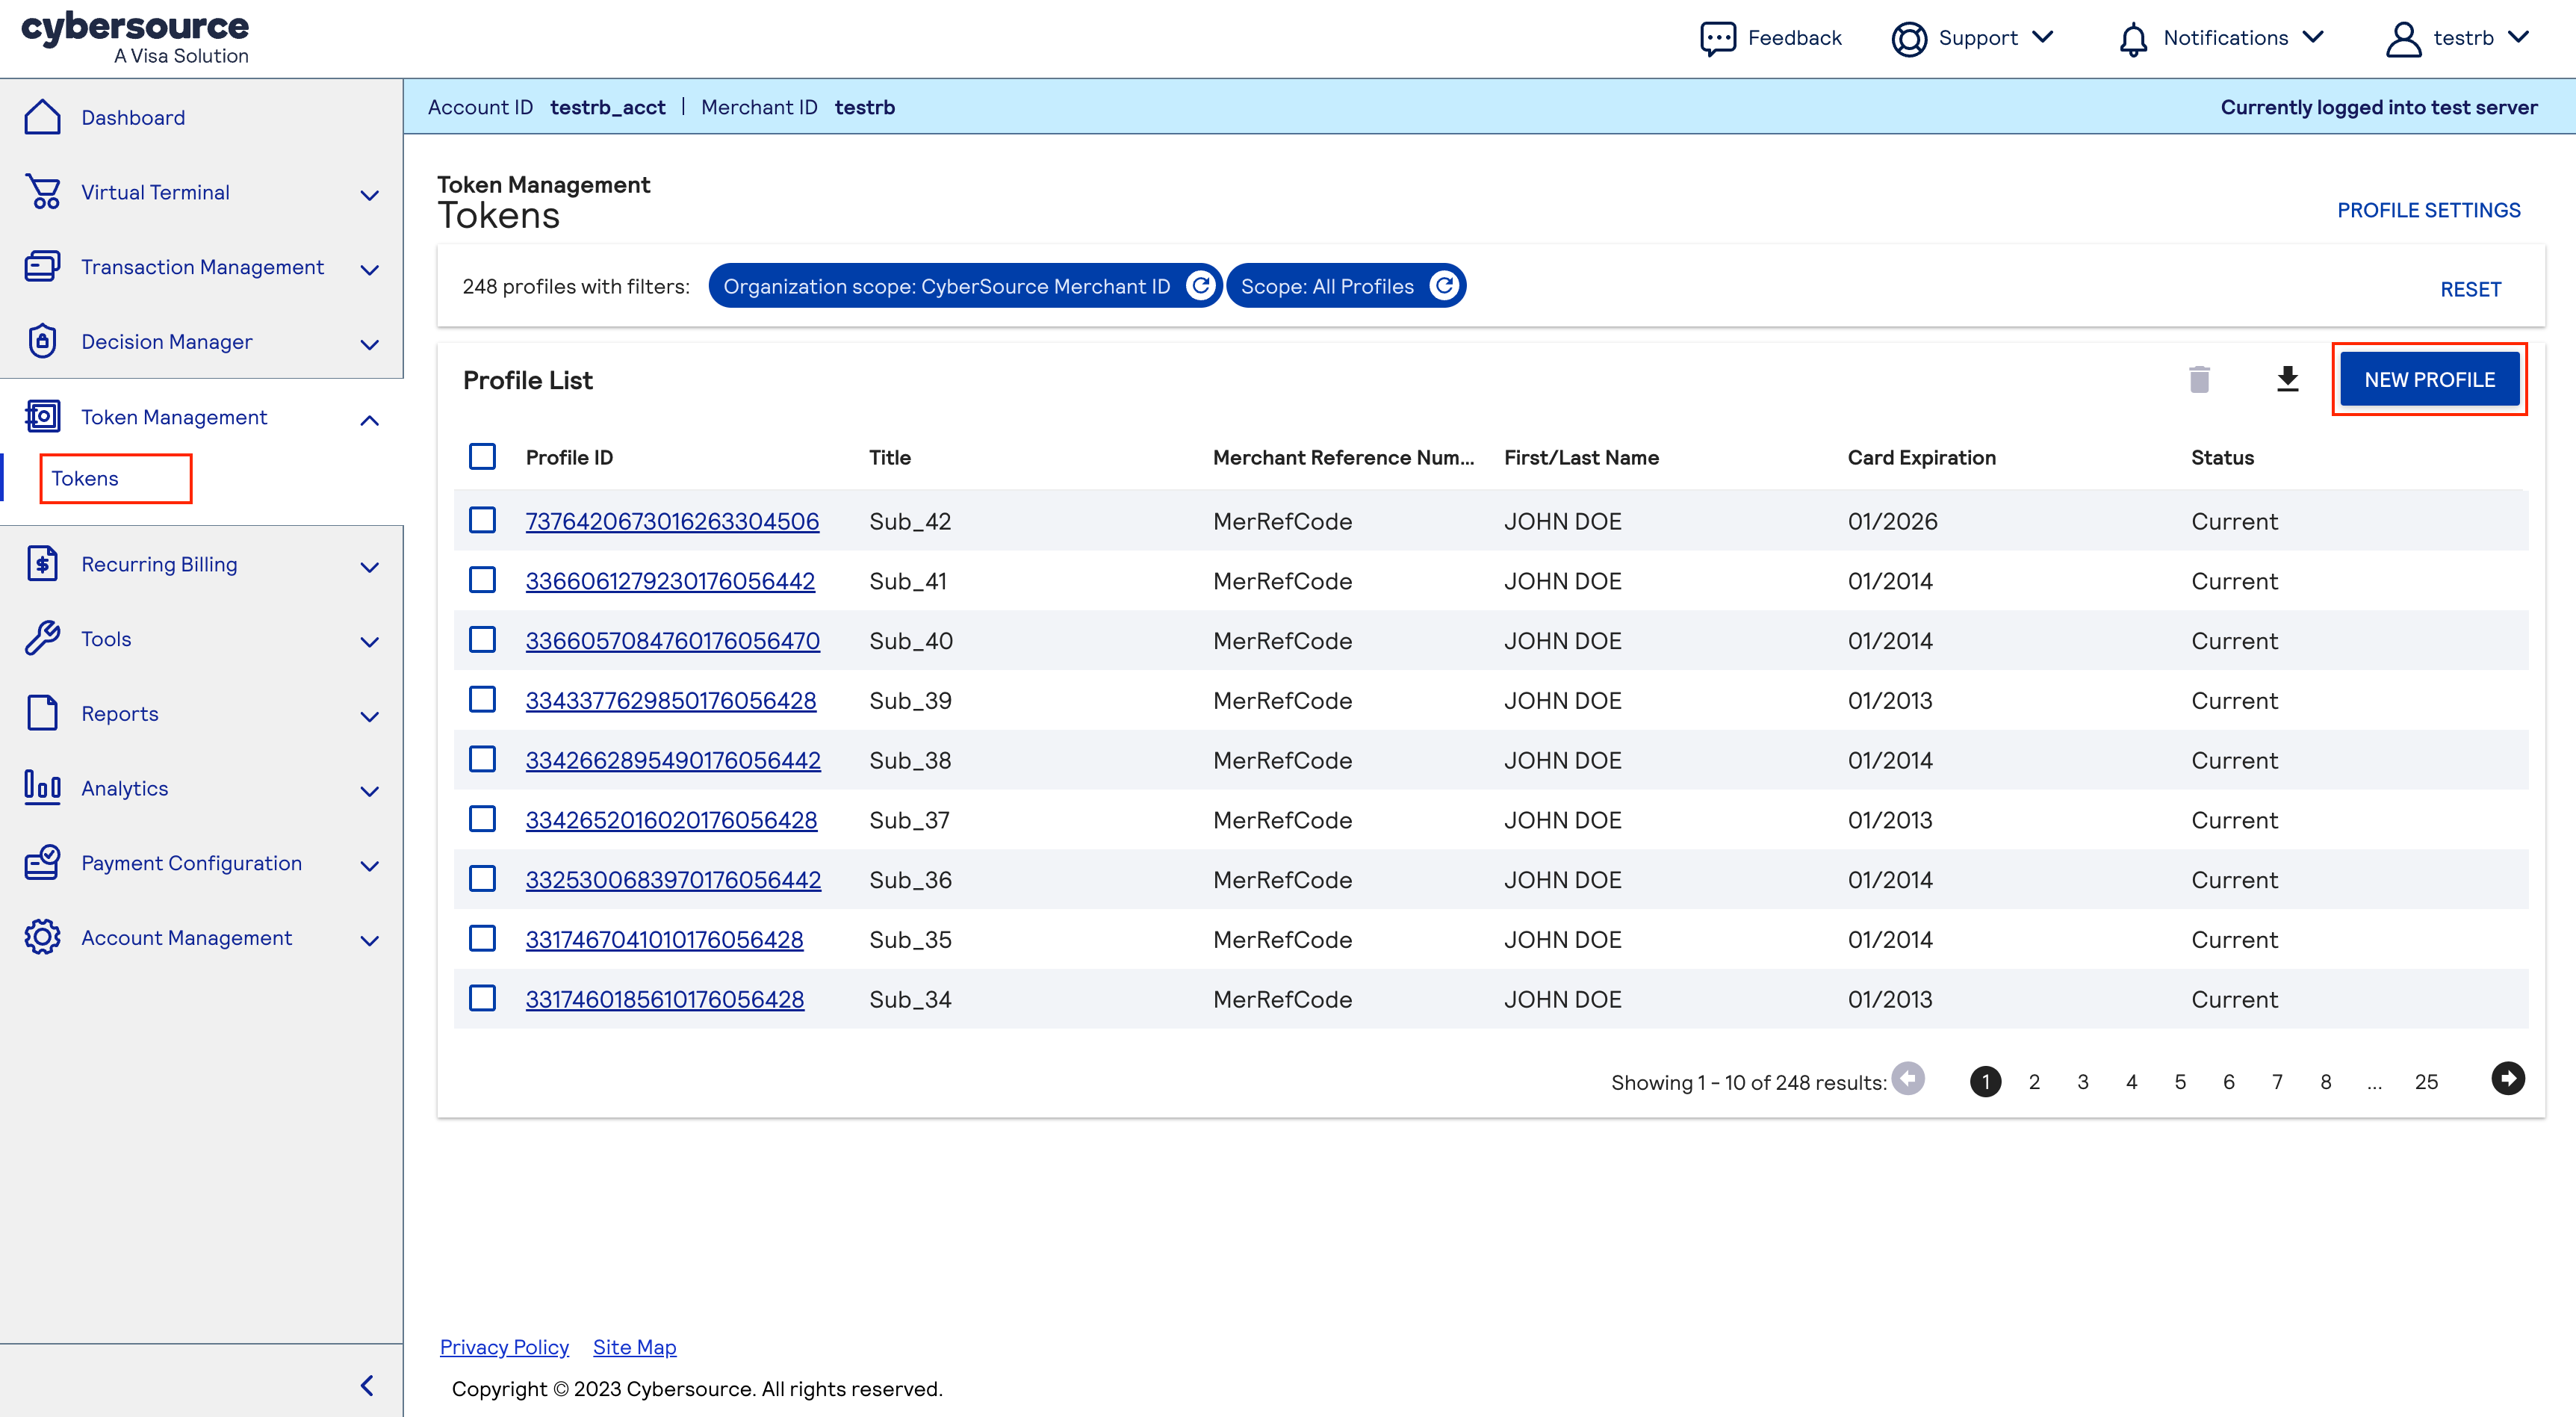
To create a subscription for a new customer without saved payment information, you can use
the Virtual Terminal to initiate authorization with token creation or use the Token Management
interface in the
Cybersource
Business Center
: - On the left navigation panel, clickToken ManagementandTokens. The Tokens screen appears.

- ClickNew Profile.

- In the Add Profile section, enter the merchant reference number, payment information, and shipping address details.
- If you want the system to perform a zero-amount authorization, you can either leave the Profile Information field empty or enter your own Amount and Set Up Fee.
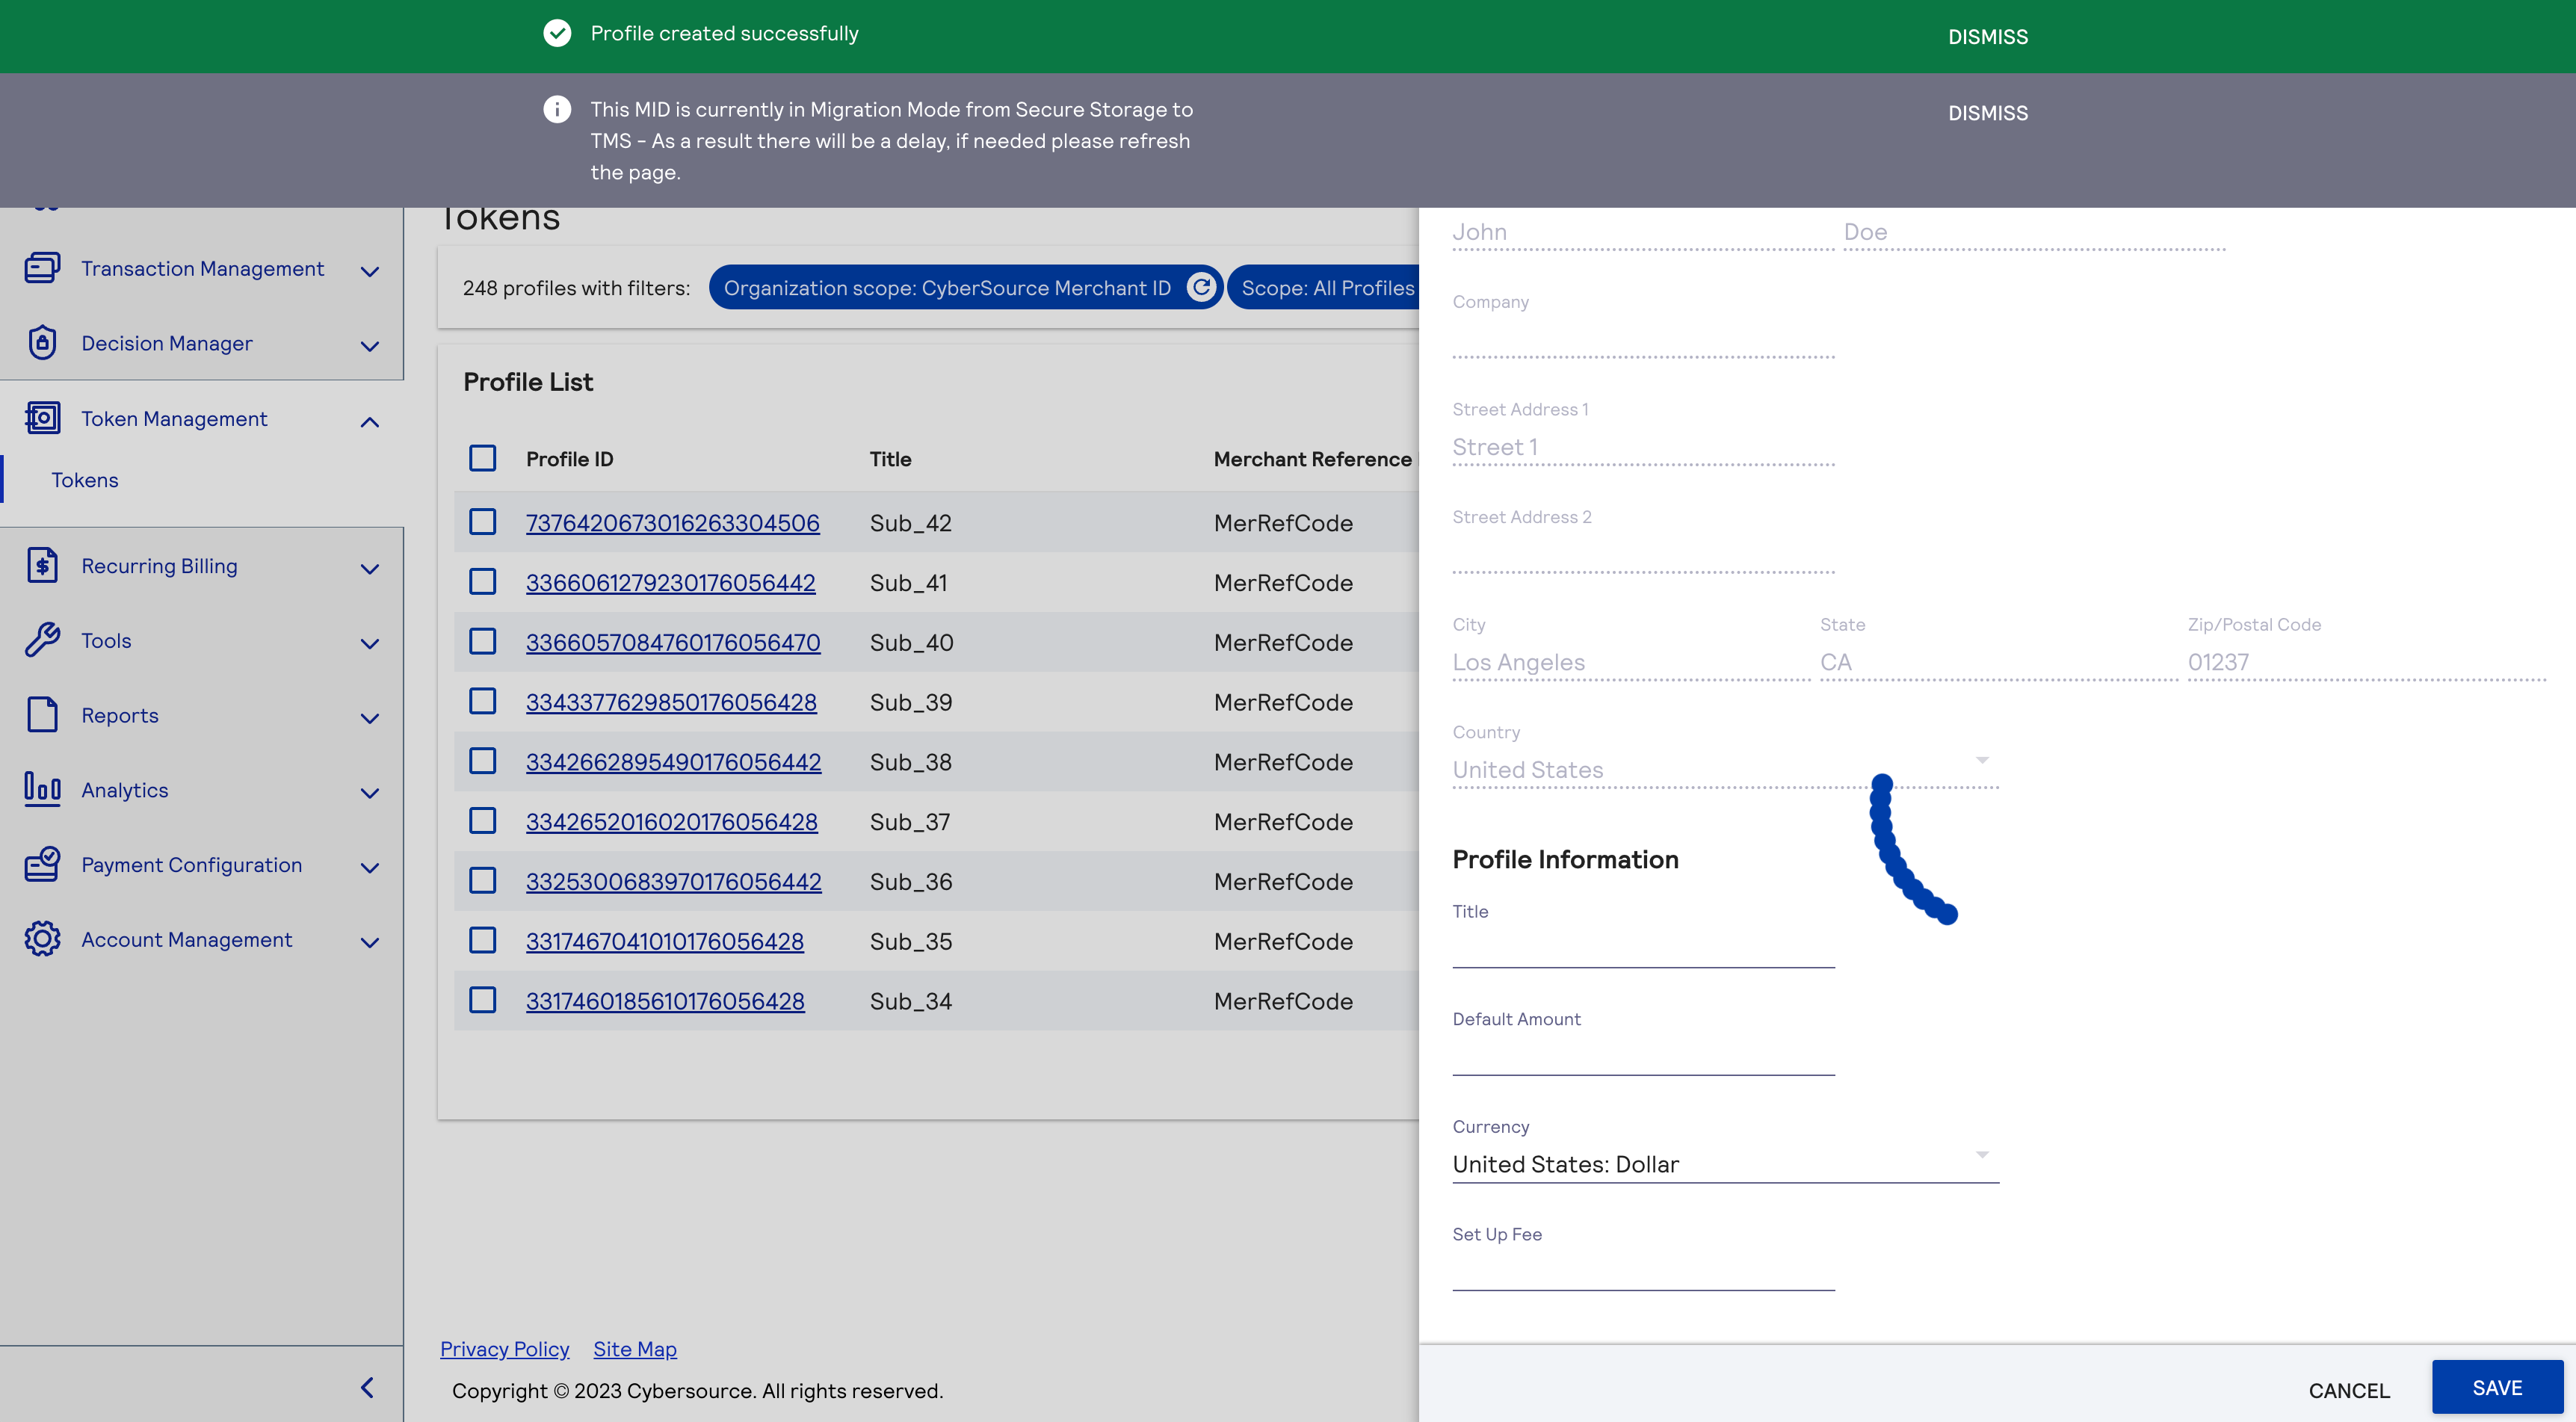
- ClickSave. A message at the top of the screen confirms that the profile is created and that migration is in progress.

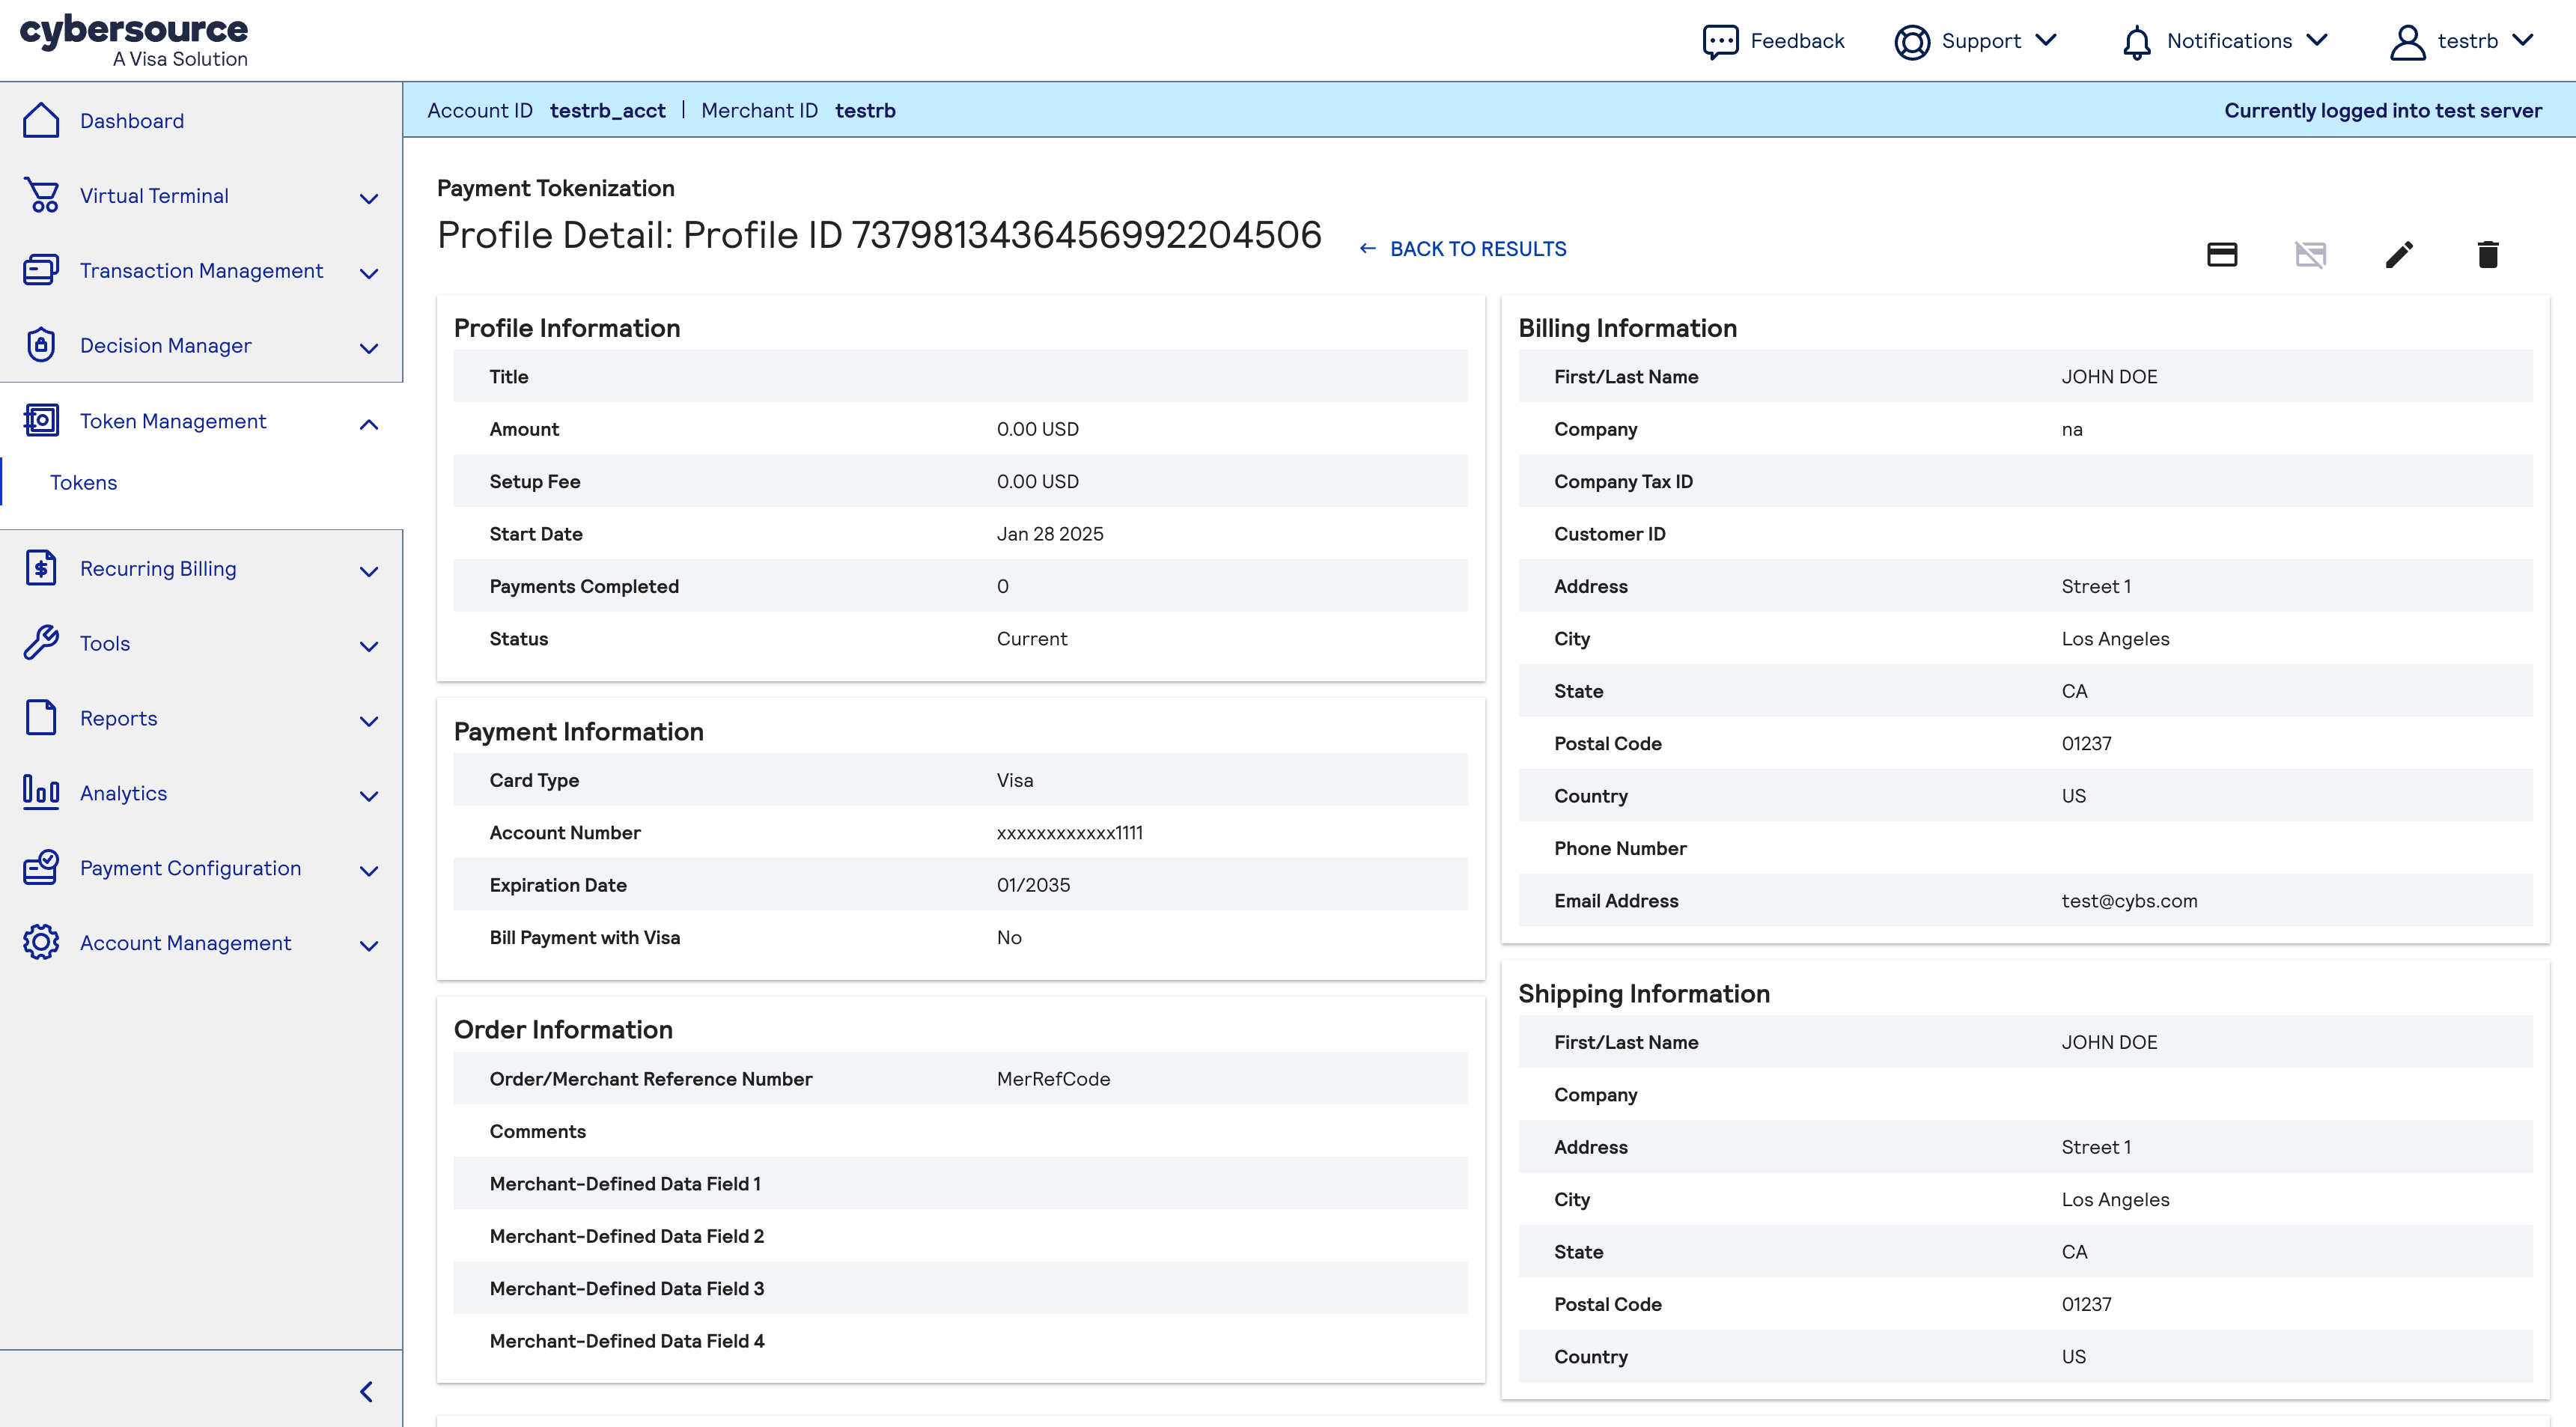
- Wait for the token to be added toTMS. When the token is added, the screen refreshes and shows detailed information about the new token.IMPORTANTDuring the synchronization period, the Tokens screen displays all tokens that are not linked to any subscription, shown in their original states:Active,CompletedorCanceled. Tokens that were associated with subscriptions will appear asCanceledduring this period. To view them, you must apply the appropriate filter. After the two-week synchronization period ends, all tokens, including those linked to subscriptions, will become visible in the new TMS interface in their correct states.

Use the existing customer flow in the upgraded Recurring Billing screen and search for the
token you just created by providing first and last name of customer. For more information, see
the Creating a Subscription with an Existing Customer Token section in the
Recurring Billing User Guide
.To apply the token to an existing customer in the Business Center:
- On the left navigation panel, clickRecurring BillingandCreate Subscription.
- In the Manage Subscriptions screen, clickCreate Subscription.
- SelectExisting Customer, and clickContinue.

- To find the customer token you just created, enter the customer's first and last name,
Two weeks after your migration is complete, you can use all features in the
Business Center
to create subscriptions. For more information, see the Creating a
Subscription with a New Customer Token section in the Recurring Billing User Guide
.Creating a Subscription with a New Customer Flow Using the Business Center
Business Center
During the payment synchronization period, you cannot use the new customer flow.
Example subscription payment history in the
Business Center
:
To create a subscription for a new customer without saved payment information,
use the
TMS
interface in the Cybersource
Business Center
: - On the left navigation panel, clickToken ManagementandTokens. The Tokens screen appears.
- ClickNew Profile.
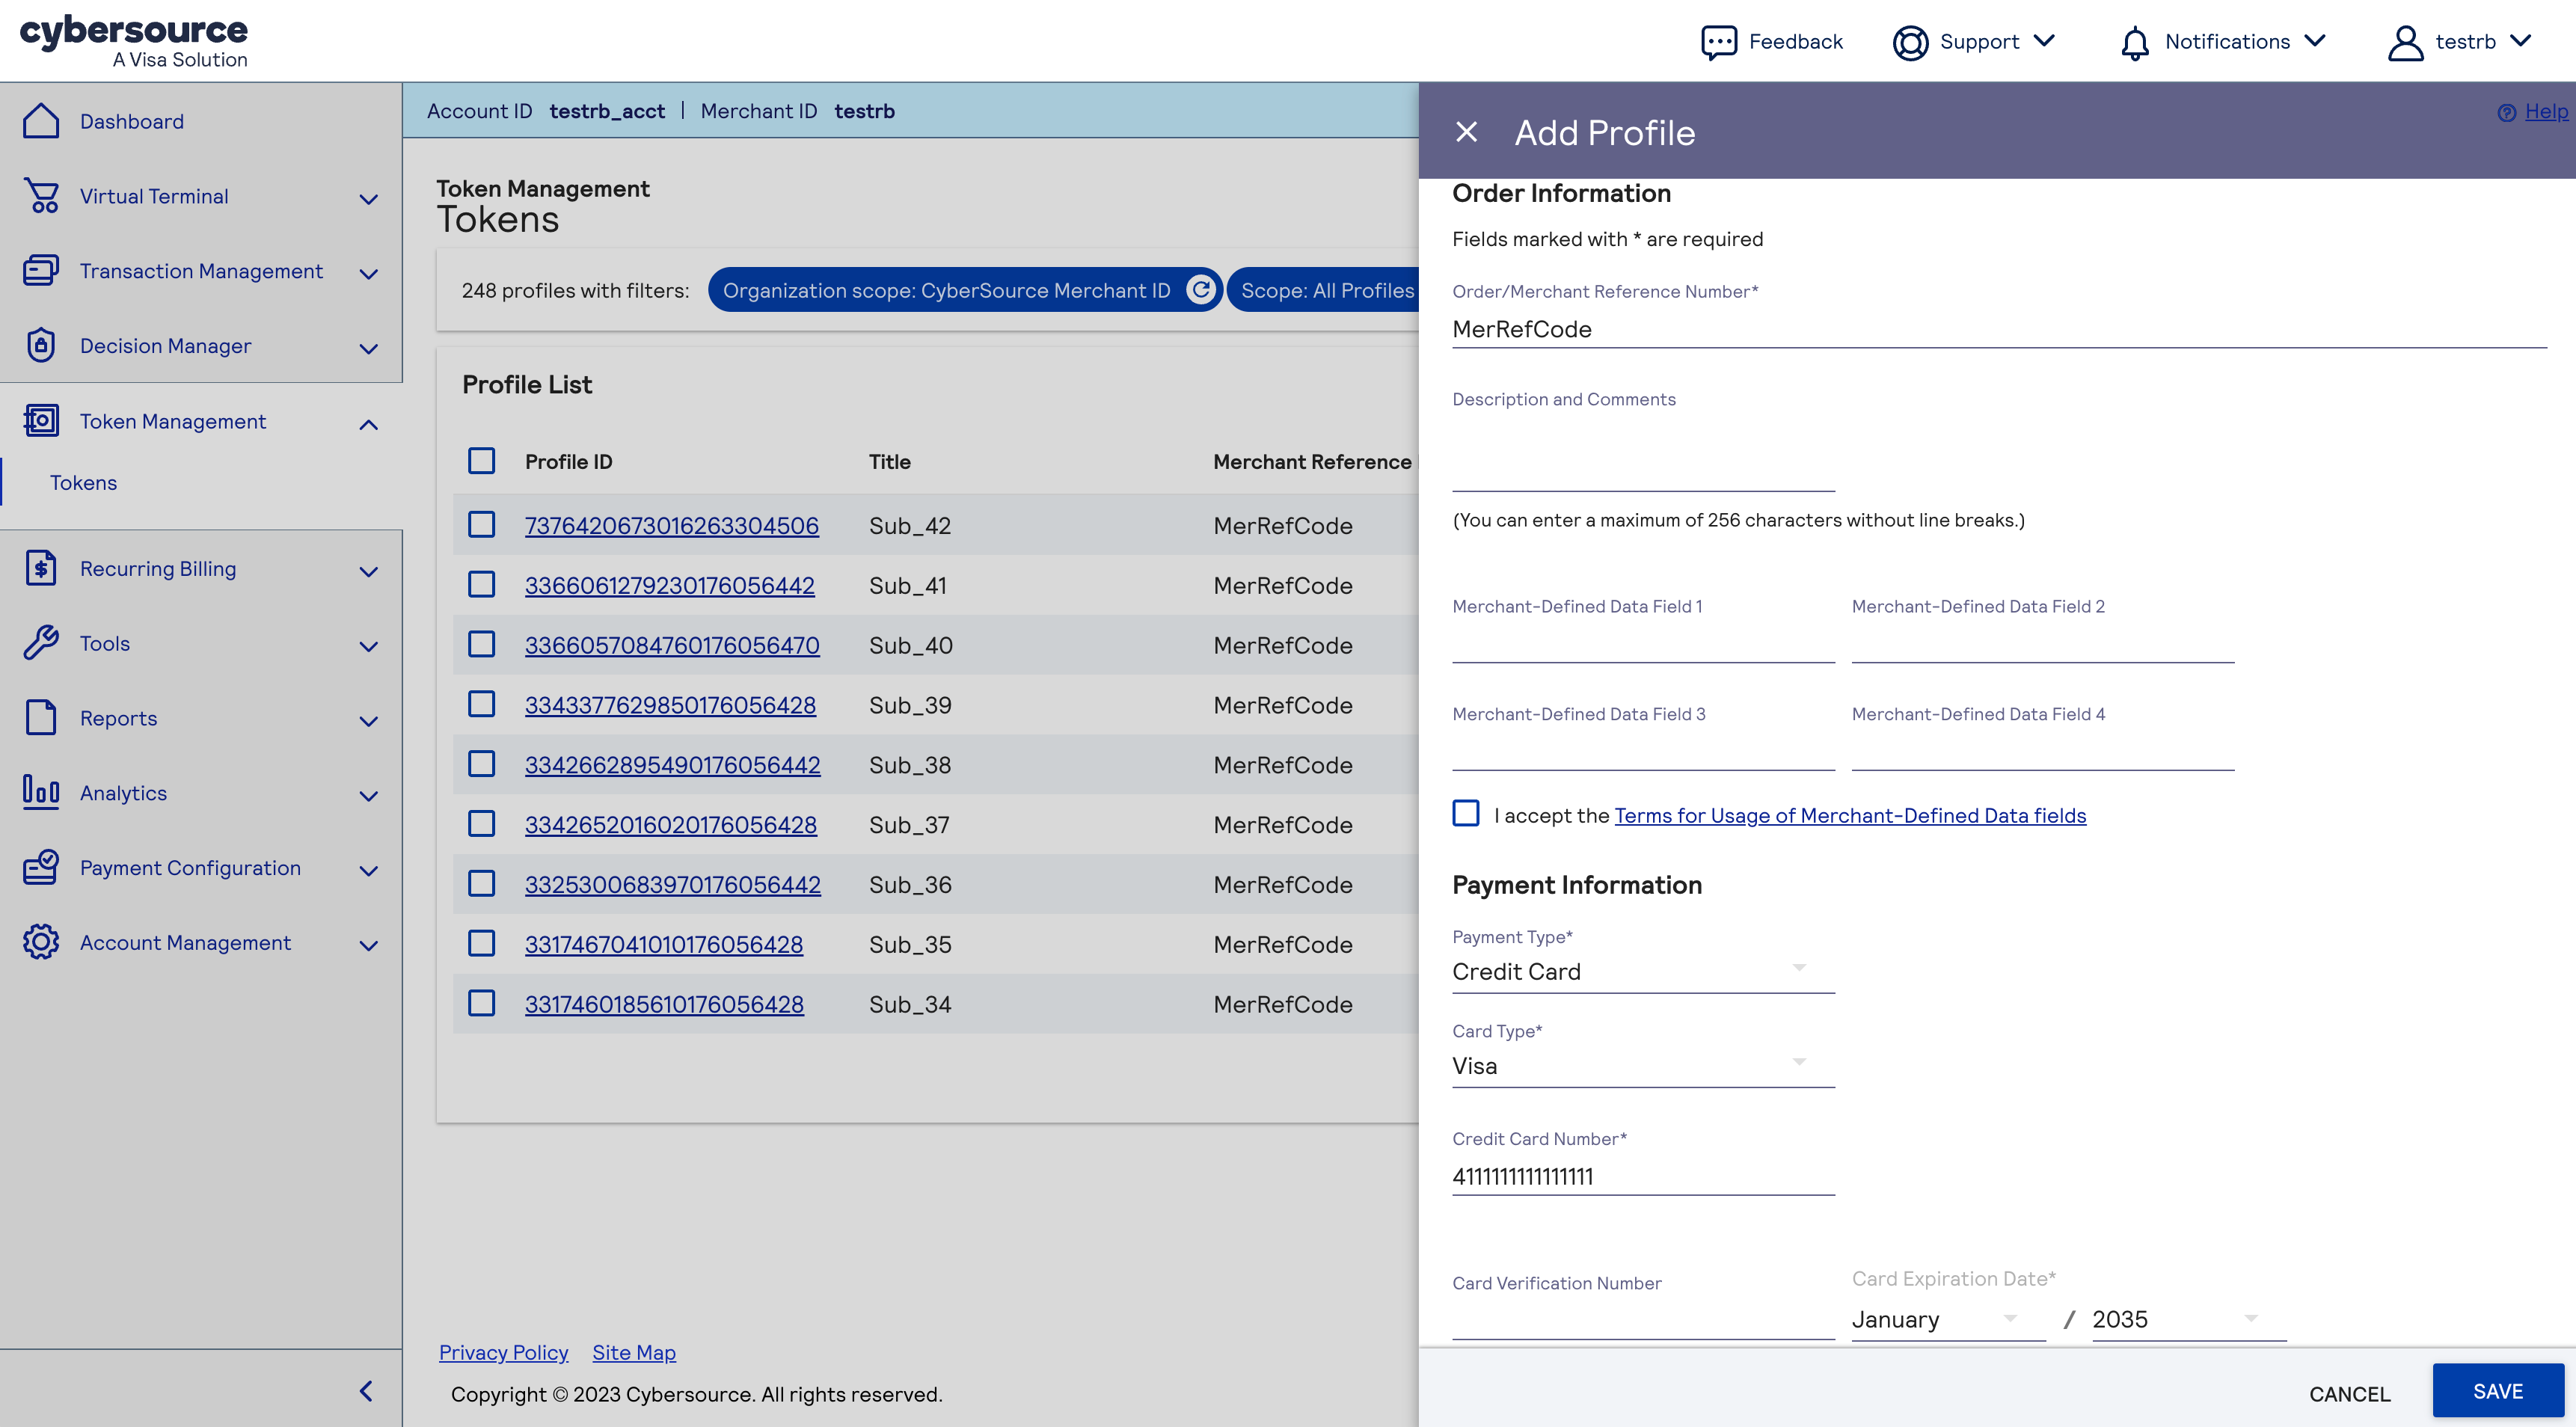
- In the Add Profile section, enter the merchant reference number, payment information, and shipping address details.
- If you want the system to perform a zero authorization, either leave the Profile Information field empty or enter your own Amount and Set Up Fee.
- ClickSave. A message at the top of the screen confirms that the profile is created and that migration is in progress.
- Wait for the token to be being added toTMS. When the token is added, the screen refreshes and shows detailed information about the new token.IMPORTANTDuring the synchronization period, the Tokens screen only display tokens not linked to any subscription, whether Active, Completed, or Canceled. You can use the existing workflow to initiate new subscriptions that use existing tokens. The upgrade process migrates all tokens. All of the tokens are visible after the synchronization period ends.
Use the existing customer flow with the token you just created.
For more information, see the Creating a Subscription with an Existing Customer Token section in the
Recurring Billing Developer Guide
.To apply the token to an existing customer in the Business Center:
- On the left navigation panel, clickRecurring BillingandCreate Subscription.
- In the Manage Subscriptions screen, clickCreate Subscription.

- SelectExisting Customer, and clickContinue.
- To find the customer token you just created, enter the customer's first and last name,
Two weeks after your migration is complete,
you can use all features in the
Business Center
to create subscriptions.
For more information, see the Creating a Subscription with a New Customer Token section in the
Recurring Billing User Guide
.Subscription Name Changes
For security reasons, the Recurring Billing service migration process may apply restrictions
or validations to legacy subscription names. If a legacy subscription name contains characters
that are not permitted by the upgraded service, the migration process replaces those
characters with a dash (
-
), which is allowed. For example, any underscore (
_
) in a legacy subscription name is replaced
with a dash (-
). IMPORTANT
When filtering or searching for subscriptions by name, be aware that
legacy subscription names may have been modified during migration to the upgraded Recurring
Billing service.
These characters are allowed:
- Lowercase letters: a-z
- Uppercase letters: A-Z
- Digits: 0-9
- Special characters: ? . , $ / @ & ! : -
- Space
These special characters are not allowed:
- # (hash)
- % (percent)
- ^ (caret)
- * (asterisk)
- ( (left parenthesis)
- ) (right parenthesis)
- _ (underscore)
- + (plus)
- = (equals)
- { (left curly brace)
- } (right curly brace)
- [ (left square bracket)
- ] (right square bracket)
- | (vertical bar)
- \ (backslash)
- ; (semicolon)
- ' (single quote)
- " (double quote)
- < (less than)
- > (greater than)
- ~ (tilde)
- ` (backtick)
These non-ASCII characters are not allowed:
- é (accented e)
- ç (cedilla)
- ü (umlaut u)
- ñ (tilde n)
- Ω (Greek Omega)
Emojis (unicode characters) are not allowed. Examples:
- smiling face
- rocket
- light bulb
These control characters are not allowed:
- \t(tab)
- \n(newline)
- \r(carriage return)
Configuring Business Center Role Permissions
Business Center
Role PermissionsThe upgraded Recurring Billing service requires you to configure Business Center role
permissions to control access to Recurring Billing and subscription features.
- Follow these steps to configure role permissions:
- In theBusiness Centerleft navigation panel, click theAccount Managementicon andRoles.
- Expand theToken Management Permissionslist.
ADDITIONAL INFORMATION
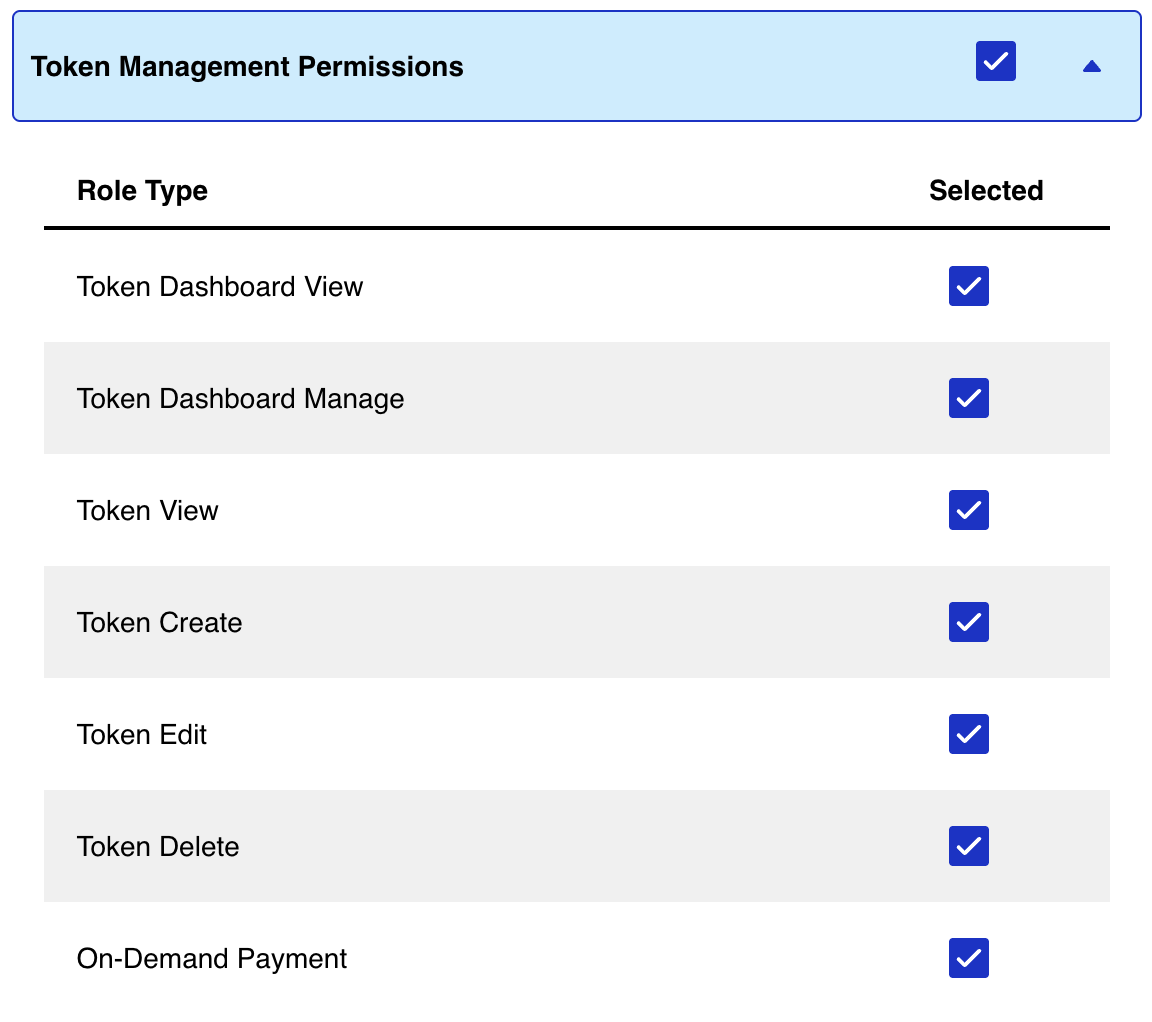
- Choose the name of each role that you want to add.
- Expand theSubscriptions and Recurring Billing Permissionslist.
ADDITIONAL INFORMATION

- Choose the name of each role that you want to add.
- ClickSave.
Make a One-Time Payment After Migration
After migrating from the legacy Recurring Billing to the new Recurring Billing service,
one-time payments are initiated using a different process. To submit a one-time, on-demand
payment, send a Make Payment request from the Token Management module in the
Cybersource
Business Center
.IMPORTANT
Perform this task only after the
payment synchronization period
is complete. See Payment Synchronization Period.- Follow these steps to request a one-time payment when you use the new Recurring Billing system:
- Log in to yourCybersourceaccount at theBusiness Center.
- On the left navigation panel, clickToken ManagementandCustomers. The Token Management Customer screen appears.
- Enter your search criteria in Search Results pane and clickSearch. The Search Results pane lists all customer tokens that match your search criteria.
- Click the Token ID link for the customer token for which you want to view details. The Customer Details page appears and shows more information about the selected customer token.
- In the Payment Methods pane, click thelinked Token ID. The Customer Details screen refreshes and shows additional information in the Billing Information, Payment Information, and Payment History panes.
- ClickMake payment. The Make a Payment for this Token window appears.
ADDITIONAL INFORMATION

- SelectYesorNoto indicate whether or not the card holder initiated the transaction.
- In the drop-down list, choose the reason for the payment.
- ClickProceed. The pop up box closes and the Virtual Terminal screen appears. If you chose Yes to indicate that this is a card holder-iniitiated transaction, the page includes a Customer Presence pane of read-only information.
- In the Order Details pane, use the Amount and Currency fields to specify the payment amount and then clickNext. The Virtual Terminal screen refreshes to show the Billing Information pane.
- Enter the customer information and clickNext. The Virtual Terminal screen refreshes to show the Order Details, Customer Information, and Payment Information panes.
- Enter the payment card details in the Payment Information pane and clickSubmit. The Order Confirmation pop-up box appears and prompts you to continue with or cancel the payment request.
- To continue, clickSubmit. The Virtual Terminal Transaction Summary page appears showing a summary of the one-time payment.
VISA Platform Connect: Specifications and Conditions for
Resellers/Partners
The following are specifications and conditions that apply to a Reseller/Partner enabling
its merchants through
Cybersource for
. Failure to meet any of the specifications and conditions below is
subject to the liability provisions and indemnification obligations under
Reseller/Partner’s contract with Visa/Cybersource.Visa Platform Connect
(“VPC”)
processing- Before boarding merchants for payment processing on a VPC acquirer’s connection, Reseller/Partner and the VPC acquirer must have a contract or other legal agreement that permits Reseller/Partner to enable its merchants to process payments with the acquirer through the dedicated VPC connection and/or traditional connection with such VPC acquirer.
- Reseller/Partner is responsible for boarding and enabling its merchants in accordance with the terms of the contract or other legal agreement with the relevant VPC acquirer.
- Reseller/Partner acknowledges and agrees that all considerations and fees associated with chargebacks, interchange downgrades, settlement issues, funding delays, and other processing related activities are strictly between Reseller and the relevant VPC acquirer.
- Reseller/Partner acknowledges and agrees that the relevant VPC acquirer is responsible for payment processing issues, including but not limited to, transaction declines by network/issuer, decline rates, and interchange qualification, as may be agreed to or outlined in the contract or other legal agreement between Reseller/Partner and such VPC acquirer.
DISCLAIMER: NEITHER VISA NOR CYBERSOURCE WILL BE RESPONSIBLE OR LIABLE FOR ANY ERRORS OR
OMISSIONS BY THE
Visa Platform Connect
ACQUIRER IN PROCESSING TRANSACTIONS. NEITHER VISA
NOR CYBERSOURCE WILL BE RESPONSIBLE OR LIABLE FOR RESELLER/PARTNER BOARDING MERCHANTS OR
ENABLING MERCHANT PROCESSING IN VIOLATION OF THE TERMS AND CONDITIONS IMPOSED BY THE
RELEVANT Visa Platform Connect
ACQUIRER.